<?xml version="1.0" encoding="utf-8"?><feed xmlns="http://www.w3.org/2005/Atom" ><generator uri="https://jekyllrb.com/" version="4.4.1">Jekyll</generator><link href="https://maker404.com/feed.xml" rel="self" type="application/atom+xml" /><link href="https://maker404.com/" rel="alternate" type="text/html" /><updated>2026-11-07T23:06:29+00:00</updated><id>https://maker404.com/feed.xml</id><title type="html">Maker404</title><subtitle>Hands-on K-8 technology, makerspace, and STEM resources with challenges, classroom tools, apps, and free downloads.</subtitle><author><name>Maker404</name></author><entry><title type="html">Bambu Lab R1 and LightBurn: A Starter Material Library You Can Download</title><link href="https://maker404.com/2026/11/07/bambu-lab-r1-lightburn-material-library-free-download/" rel="alternate" type="text/html" title="Bambu Lab R1 and LightBurn: A Starter Material Library You Can Download" /><published>2026-11-07T00:00:00+00:00</published><updated>2026-11-07T00:00:00+00:00</updated><id>https://maker404.com/2026/11/07/bambu-lab-r1-lightburn-material-library-free-download</id><content type="html" xml:base="https://maker404.com/2026/11/07/bambu-lab-r1-lightburn-material-library-free-download/"><![CDATA[<p>My Bambu Lab R1 is arriving this week, so I have been getting my software ready ahead of time. It is replacing the xTool D1 10W diode laser I have used for years, and I am also teaching my students how to use a laser at school, where we have a Dremel LC40 and an OMTech Polar Lite. The R1 launched with Bambu Suite as its only software, but Bambu has since confirmed LightBurn support. LightBurn is what I use across all of my lasers, so I wanted the R1 to fit the same workflow.</p>

<p>I got the device configuration file working in LightBurn quickly. What I could not find anywhere was a <strong>material library</strong>, the list of saved power and speed settings for wood, acrylic, and so on. Bambu’s LightBurn setup file only contains the machine profile. The settings live inside Bambu Suite.</p>

<p>So I built a library from them.</p>

<h2 id="where-the-settings-come-from">Where the settings come from</h2>

<p>Bambu Suite stores its material presets as plain JSON files on your computer, one set per material. Each material has separate settings for cutting, line engraving, fill engraving, and image engraving, and many have different versions for different Bambu machines. I pulled out the R1 55W versions and converted them into a LightBurn <code class="language-plaintext highlighter-rouge">.clb</code> library file.</p>

<p>On a Mac, they are in <code class="language-plaintext highlighter-rouge">~/Library/Application Support/Bambu Suite</code>, in a subfolder called <code class="language-plaintext highlighter-rouge">preset2d</code>. I did this on a Mac, and I have not checked where the Windows version keeps them.</p>

<p>I asked Claude to investigate the files in that folder and write a script that converts the R1 presets into a LightBurn library. I then loaded the result into LightBurn myself to check that it imports and applies the right values.</p>

<p>The result is 35 materials and 139 entries, including 3mm and 2mm basswood, birch, walnut, MDF, clear and colored acrylic, cork, paper, leather, felt, and slate.</p>

<h2 id="what-a-preset-looks-like">What a preset looks like</h2>

<p>Here is a trimmed excerpt from Bambu’s 3mm basswood file for the R1. Each process type has its own power (as a percentage), speed (in mm/s), and a few extras.</p>

<div class="language-json highlighter-rouge"><div class="highlight"><pre class="highlight"><code><span class="nl">"LaserFillEngrave"</span><span class="p">:</span><span class="w"> </span><span class="p">{</span><span class="w">
    </span><span class="nl">"max_power"</span><span class="p">:</span><span class="w"> </span><span class="mi">15</span><span class="p">,</span><span class="w">
    </span><span class="nl">"speed"</span><span class="p">:</span><span class="w"> </span><span class="mi">460</span><span class="p">,</span><span class="w">
    </span><span class="nl">"scanning_interval"</span><span class="p">:</span><span class="w"> </span><span class="mf">0.1</span><span class="p">,</span><span class="w">
    </span><span class="nl">"air_speed"</span><span class="p">:</span><span class="w"> </span><span class="mi">70</span><span class="w">
</span><span class="p">}</span><span class="err">,</span><span class="w">
</span><span class="nl">"LaserLineCut"</span><span class="p">:</span><span class="w"> </span><span class="p">{</span><span class="w">
    </span><span class="nl">"max_power"</span><span class="p">:</span><span class="w"> </span><span class="mi">75</span><span class="p">,</span><span class="w">
    </span><span class="nl">"speed"</span><span class="p">:</span><span class="w"> </span><span class="mi">30</span><span class="p">,</span><span class="w">
    </span><span class="nl">"number_of_passes"</span><span class="p">:</span><span class="w"> </span><span class="mi">1</span><span class="p">,</span><span class="w">
    </span><span class="nl">"air_speed"</span><span class="p">:</span><span class="w"> </span><span class="mi">100</span><span class="w">
</span><span class="p">}</span><span class="w">
</span></code></pre></div></div>

<p>In the LightBurn library, the fill entry becomes a Fill layer at 15% power, 460 mm/s, and a 0.10 mm interval. The cut entry becomes a Line layer at 75% and 30 mm/s.</p>

<h2 id="a-few-example-values">A few example values</h2>

<p>These are Bambu’s own numbers for the R1, not my tested settings.</p>

<table>
  <thead>
    <tr>
      <th>Material (3mm)</th>
      <th>Process</th>
      <th>Power</th>
      <th>Speed</th>
    </tr>
  </thead>
  <tbody>
    <tr>
      <td>Basswood plywood</td>
      <td>Cut</td>
      <td>75%</td>
      <td>30 mm/s</td>
    </tr>
    <tr>
      <td>Basswood plywood</td>
      <td>Fill engrave (0.10 mm interval)</td>
      <td>15%</td>
      <td>460 mm/s</td>
    </tr>
    <tr>
      <td>Clear acrylic</td>
      <td>Cut</td>
      <td>80%</td>
      <td>10 mm/s</td>
    </tr>
    <tr>
      <td>MDF</td>
      <td>Cut</td>
      <td>80%</td>
      <td>8 mm/s</td>
    </tr>
  </tbody>
</table>

<h2 id="what-does-not-carry-over-from-suite-to-lightburn">What does not carry over from Suite to LightBurn</h2>

<p>Some of Bambu’s settings have no LightBurn equivalent, so I noted them in each entry’s description:</p>

<ul>
  <li><strong>Air assist.</strong> Suite varies air strength by process. LightBurn sends air at full strength for everything.</li>
  <li><strong>Acceleration.</strong> Suite sets it per process. LightBurn cannot set it per layer.</li>
  <li><strong>Fill outline.</strong> This is a Suite option that traces the edge of a fill after engraving. In LightBurn, use the separate “Fill Outline” entry on its own line layer.</li>
  <li><strong>Dual scanning.</strong> Suite scans in both directions for even coverage. The LightBurn version is the Crosshatch option on a Fill layer. The presets leave it off.</li>
  <li><strong>Material height.</strong> The R1 profile has Z control on, so LightBurn needs a material height. The library’s thickness values fill that in when you assign an entry.</li>
</ul>

<h2 id="how-to-install-it">How to install it</h2>

<ol>
  <li>Download the library file below.</li>
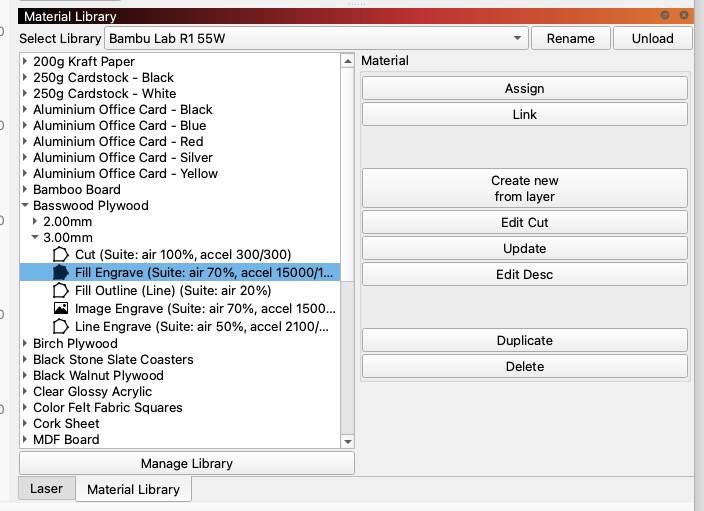
  <li>In LightBurn, open the Library window and click <strong>Load</strong>.</li>
  <li>Pick <code class="language-plaintext highlighter-rouge">Bambu_R1_55W.clb</code> and choose it from the Select Library list.</li>
  <li>Select a layer, pick an entry, and click <strong>Assign</strong>. Selecting an entry alone does not change the layer.</li>
</ol>

<p><img src="/assets/uploads/bambu-r1-lightburn-material-library.jpg" alt="LightBurn Material Library window with the Bambu Lab R1 55W library loaded, showing the 3.00mm Basswood Plywood entries" /></p>

<p><strong>👉 <a href="/downloads/Bambu_R1_55W.clb">Download: Bambu_R1_55W.clb (LightBurn material library)</a></strong></p>

<h2 id="test-before-you-trust-it">Test before you trust it</h2>

<p>Treat every value as a starting point. Run LightBurn’s Material Test on a scrap of your actual material before a real job. Bambu tuned these for Suite, and small differences in how LightBurn sends the job can shift the results.</p>

<p>I will post an update with my own test results and a corrected version of the file after the R1 is set up. If you try the library first, I would like to hear how it goes.</p>

<p><em>The settings in this library come from Bambu Lab’s own Bambu Suite presets. Bambu Lab and LightBurn are not affiliated with Maker404.</em></p>]]></content><author><name>James Crawford</name></author><category term="Makerspace" /><category term="Apps &amp; Tools" /><category term="laser" /><category term="bambu-r1" /><category term="lightburn" /><category term="makerspace" /><summary type="html"><![CDATA[Bambu's R1 laser works with LightBurn, but there is no material library for it yet. Here is how I built one from Bambu Suite's own presets, plus a free download.]]></summary><media:thumbnail xmlns:media="http://search.yahoo.com/mrss/" url="https://maker404.com/assets/uploads/bambu-r1-order-confirmation.jpg" /><media:content medium="image" url="https://maker404.com/assets/uploads/bambu-r1-order-confirmation.jpg" xmlns:media="http://search.yahoo.com/mrss/" /></entry><entry><title type="html">MillMage Bit Library: Why Teaching LightBurn First Speeds Up CNC Lessons</title><link href="https://maker404.com/2026/10/29/millmage-bit-library-teaching-students-software-from-the-same-developer/" rel="alternate" type="text/html" title="MillMage Bit Library: Why Teaching LightBurn First Speeds Up CNC Lessons" /><published>2026-10-29T00:00:00+00:00</published><updated>2026-10-29T00:00:00+00:00</updated><id>https://maker404.com/2026/10/29/millmage-bit-library-teaching-students-software-from-the-same-developer</id><content type="html" xml:base="https://maker404.com/2026/10/29/millmage-bit-library-teaching-students-software-from-the-same-developer/"><![CDATA[<p>In my Tech Ed class, students already learn LightBurn for the laser cutter. Our woodshop also has an older CNC router, and we want students using it. When I heard LightBurn’s developers had made CNC router software called MillMage, the choice felt easy. If students already know how LightBurn thinks, they should have a head start on MillMage.</p>

<p>I am planning to start teaching it in the second trimester. Before I put it in front of students, I wanted to learn it myself, and I wanted to learn it faster than they do. So I installed MillMage at home and ran it on my Onefinity CNC. This post covers why I think same-developer software is a good teaching strategy, the first problem I hit, and the free tool I built to solve it.</p>

<h2 id="why-teach-software-from-the-same-developer">Why teach software from the same developer?</h2>

<p>Every new program asks students to learn two things at once: the <em>software</em>, and the <em>job the software does</em>. A student opening a CNC program for the first time has to figure out where things are, what the words mean, and what a toolpath even is. That is a lot to carry at once.</p>

<p>When two programs come from the same developers, the first part gets much smaller. Here is what I expect to carry over from LightBurn to MillMage:</p>

<ul>
  <li><strong>Layout and navigation.</strong> Students already know how to import artwork, move and scale shapes, and find the settings panels. They are not hunting for the basics.</li>
  <li><strong>The workflow.</strong> Design, set the job up, preview it, then send it to the machine. Students who have run the laser already know that rhythm.</li>
  <li><strong>Vocabulary and habits.</strong> Ideas like layers, previewing before running, and saving a project file become familiar before the CNC adds new ones.</li>
  <li><strong>Confidence.</strong> A student who has already succeeded with one program tends to approach the next one with less fear of clicking the wrong thing.</li>
</ul>

<p>That leaves more class time for what is actually new. A router is not a laser. Students still have to learn about bits, feeds and speeds, workholding, tabs, and keeping their hands clear of a spinning cutter. I would rather spend a lesson on those than on where the Open button is.</p>

<p>I should be honest that I have not taught MillMage to a class yet. This is my plan and my reasoning, and I will report back after the second trimester starts. If you teach with LightBurn already, I think it is a strong reason to look at MillMage for your router.</p>

<h2 id="learning-it-myself-first">Learning it myself first</h2>

<p>I teach better when I have made the mistakes before the students do. Running MillMage on my Onefinity at home lets me find the rough spots, write the instructions, and know what to say when a student asks “why is it doing that?”</p>

<p>It is also a good way to check my own assumptions. The skills that transfer in my head need to transfer for a real seventh grader in a real class period, and I will only know once they try it.</p>

<h2 id="the-first-hurdle-an-empty-bit-library">The first hurdle: an empty bit library</h2>

<p>The biggest hurdle was small and annoying. MillMage’s bit library did not exist yet when I started. A CNC program needs to know about your cutters, including diameter, flutes, and a starting feed rate, plunge rate, and spindle speed. Without a library, you enter every bit by hand, one field at a time.</p>

<p>I own a lot of bits. Typing in each one would take a long time, and it would be easy to make a typo in a feed rate. At school it gets worse. Every new bit we buy would need the same treatment, and students could mistype values on a real machine.</p>

<p>So I built <strong><a href="https://bits.maker404.com/">Bit Library Builder</a></strong>, a free web tool that creates a MillMage <code class="language-plaintext highlighter-rouge">.tools</code> file for you.</p>

<h2 id="what-bit-library-builder-does">What Bit Library Builder does</h2>

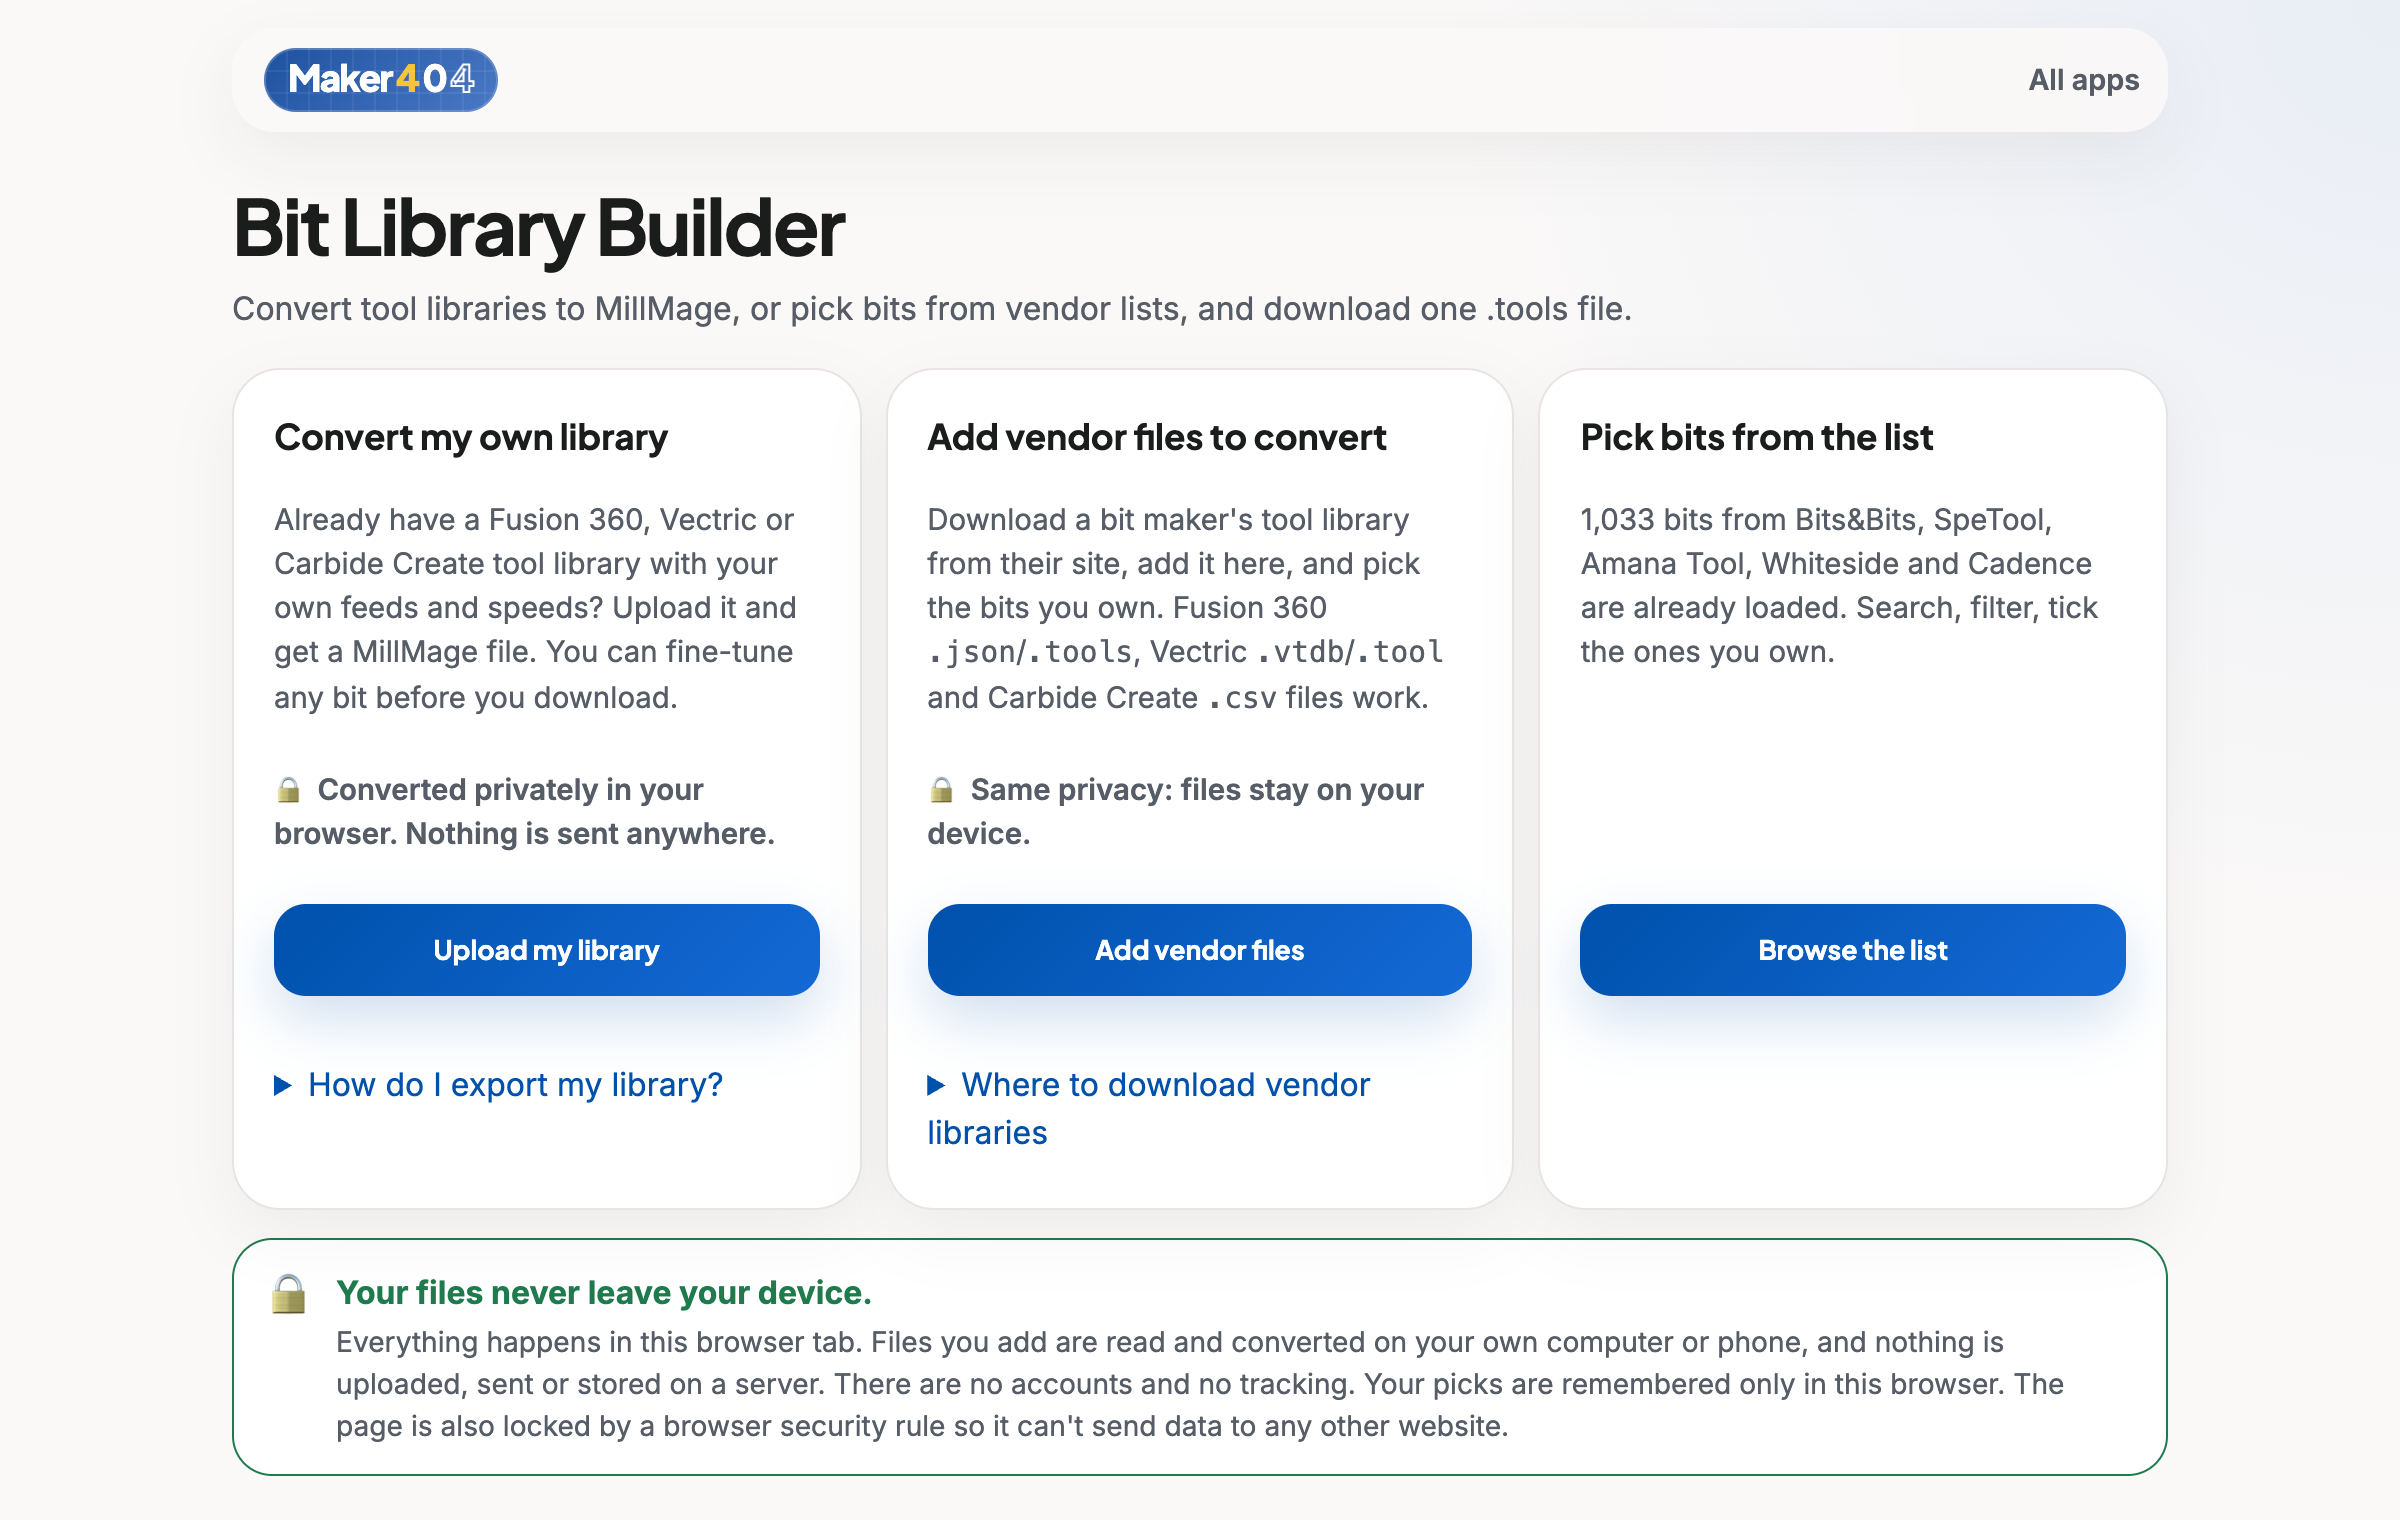
<p><img src="/assets/uploads/bit-library-builder-start.png" alt="The Bit Library Builder start screen with three choices for building a MillMage tool library" /></p>

<p>The start screen gives you three ways in:</p>

<ol>
  <li><strong>Convert my own library.</strong> If you already have a tool library in Fusion 360, Vectric, or Carbide Create with your own feeds and speeds, upload it and get a MillMage file back. You can fine-tune any bit before you download.</li>
  <li><strong>Add vendor files.</strong> Download a bit maker’s own tool library, add it to the tool, and pick the bits you own. It reads Fusion 360 <code class="language-plaintext highlighter-rouge">.json</code> and <code class="language-plaintext highlighter-rouge">.tools</code> files, Vectric <code class="language-plaintext highlighter-rouge">.vtdb</code> and <code class="language-plaintext highlighter-rouge">.tool</code> files, and Carbide Create <code class="language-plaintext highlighter-rouge">.csv</code> files.</li>
  <li><strong>Pick bits from the list.</strong> More than 1,000 bits from Bits&amp;Bits, SpeTool, Amana Tool, Whiteside, and Cadence are already loaded. You search, filter, and tick the ones you own.</li>
</ol>

<h3 id="search-and-filter">Search and filter</h3>

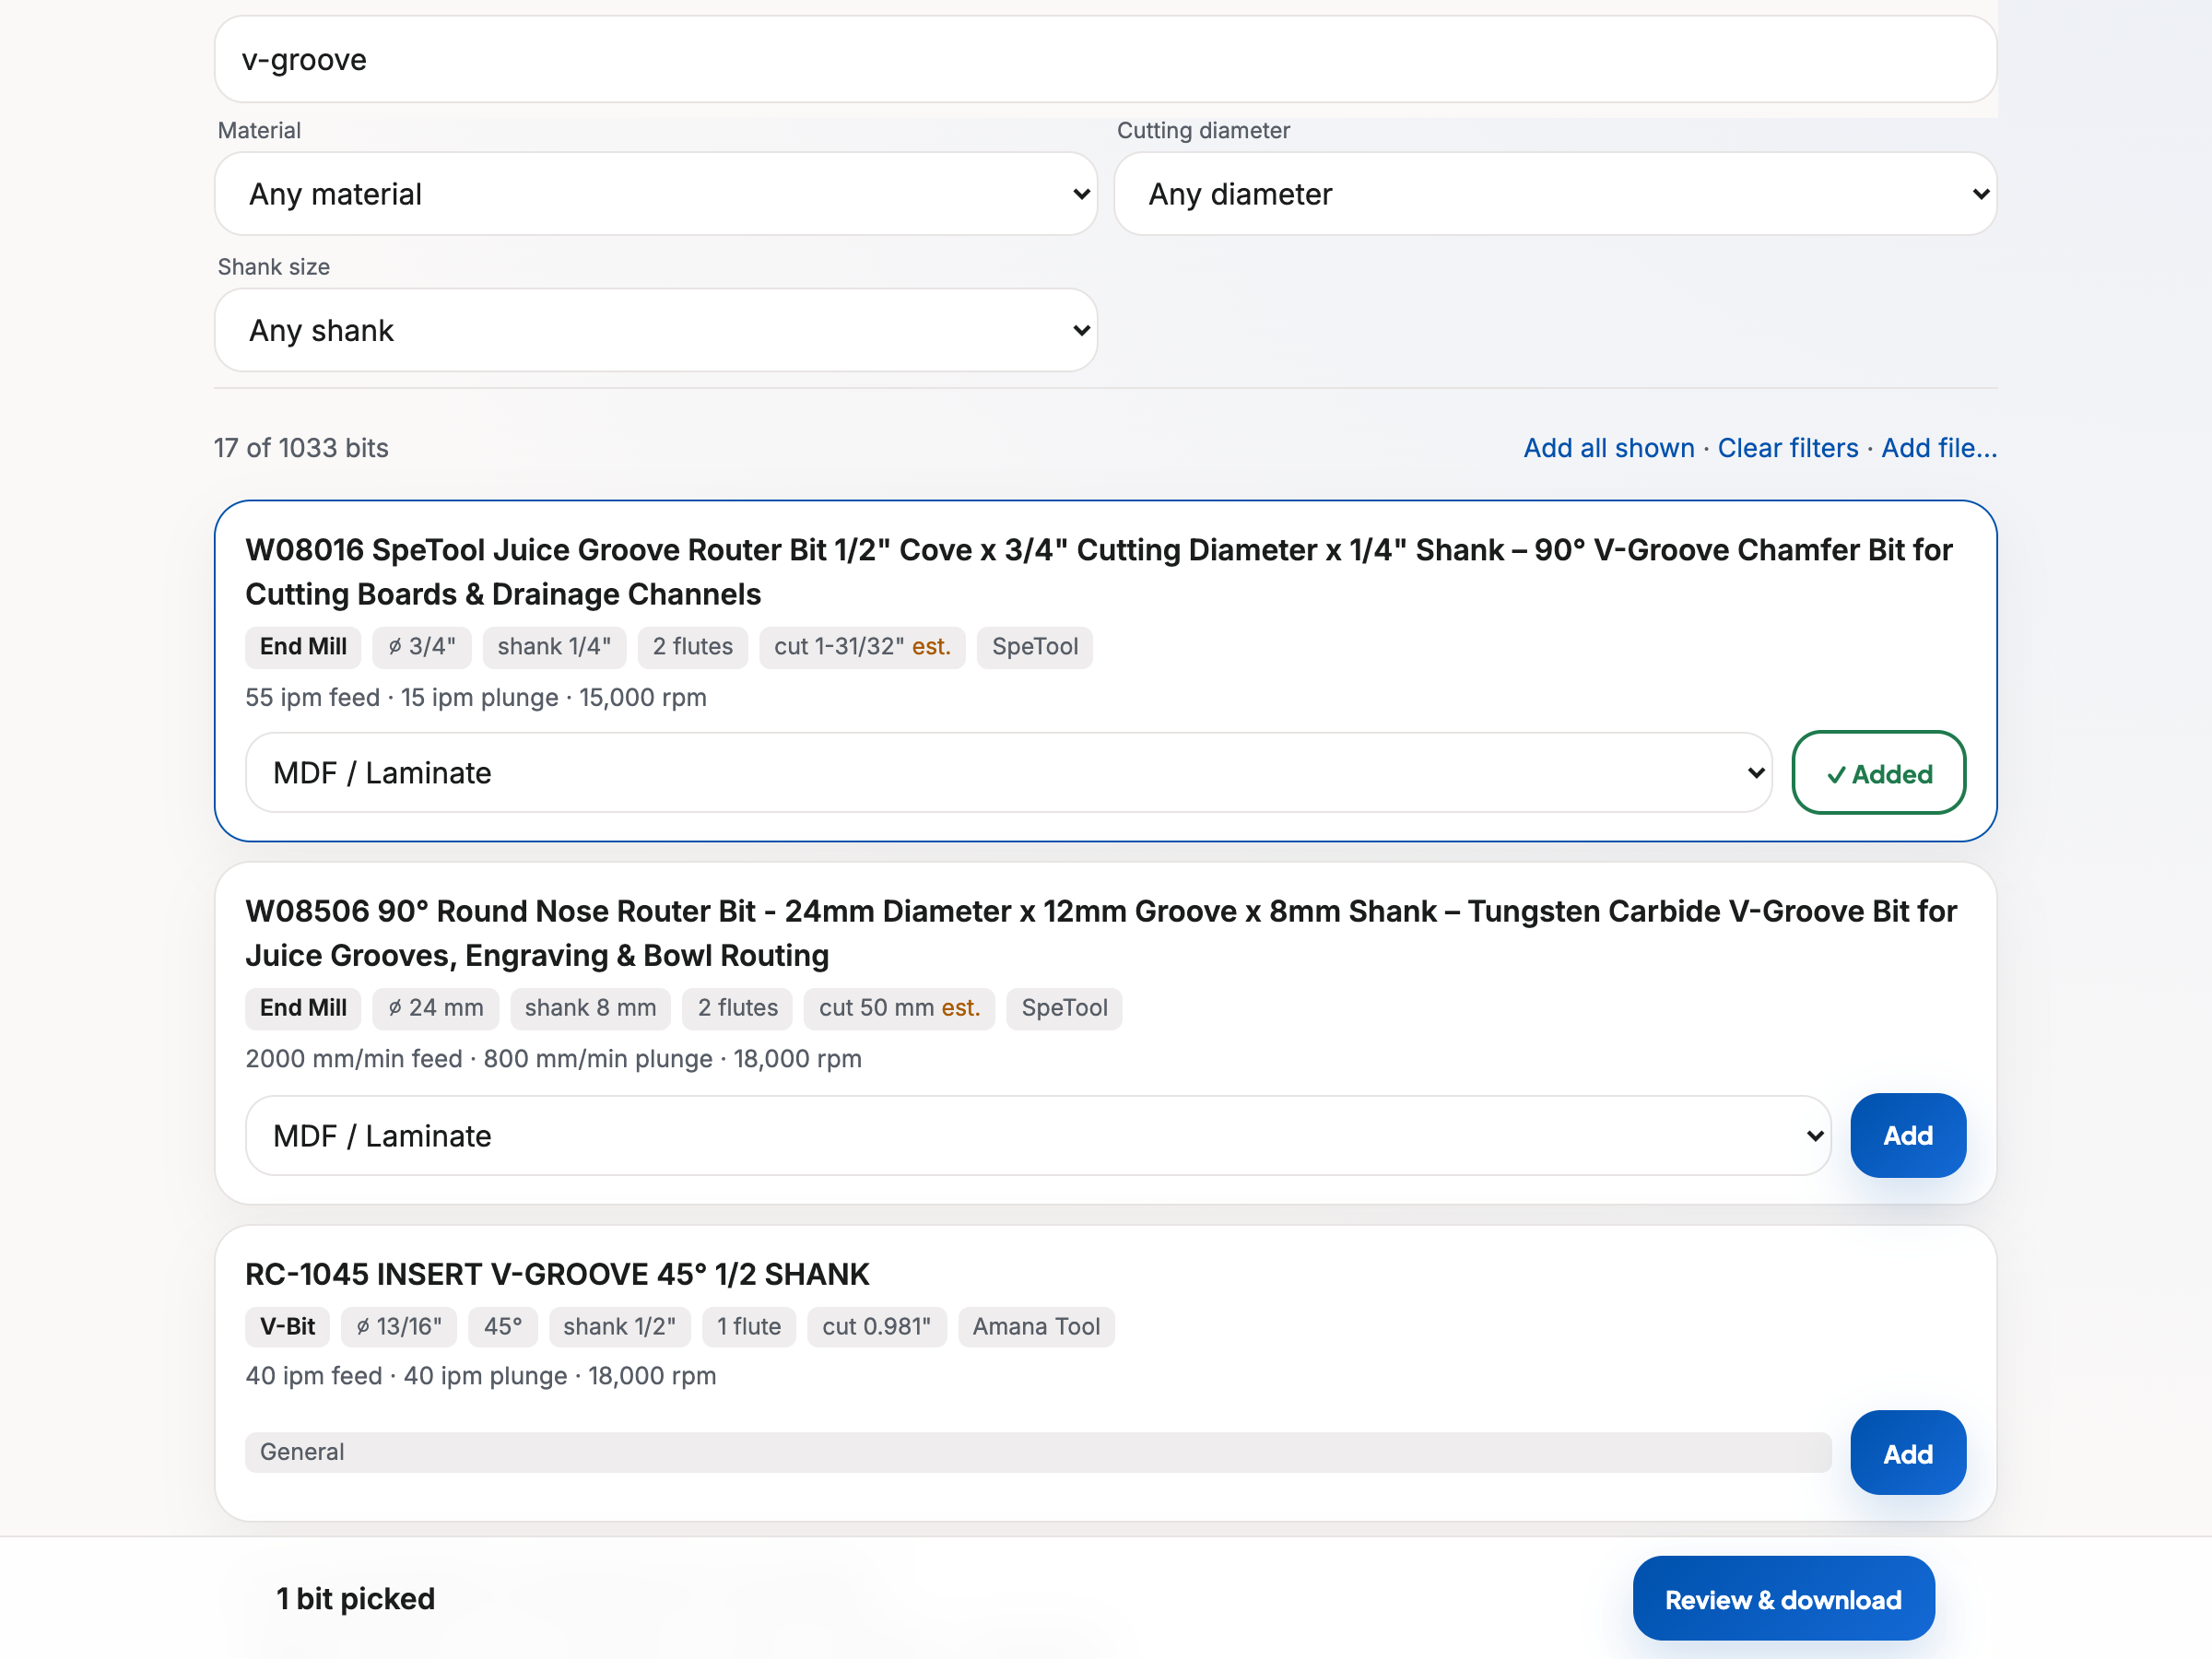
<p><img src="/assets/uploads/bit-library-builder-search.png" alt="Searching the Bit Library Builder list for V-groove bits, with filters for bit type, vendor, material, diameter, and shank size" /></p>

<p>Each bit shows its type, diameter, shank size, flute count, cutting length, vendor, and the vendor’s suggested feed, plunge, and RPM. You can filter by bit type (end mill, ball mill, V-bit, tapered, and more), by vendor, by material, by cutting diameter, and by shank size. Search understands things like “1/4 down spiral” or a part number.</p>

<p>Some cutting lengths are marked <em>est.</em>, which means the vendor did not list one and the tool estimated it. I would check those against the bit in your hand.</p>

<h3 id="review-and-edit-before-you-download">Review and edit before you download</h3>

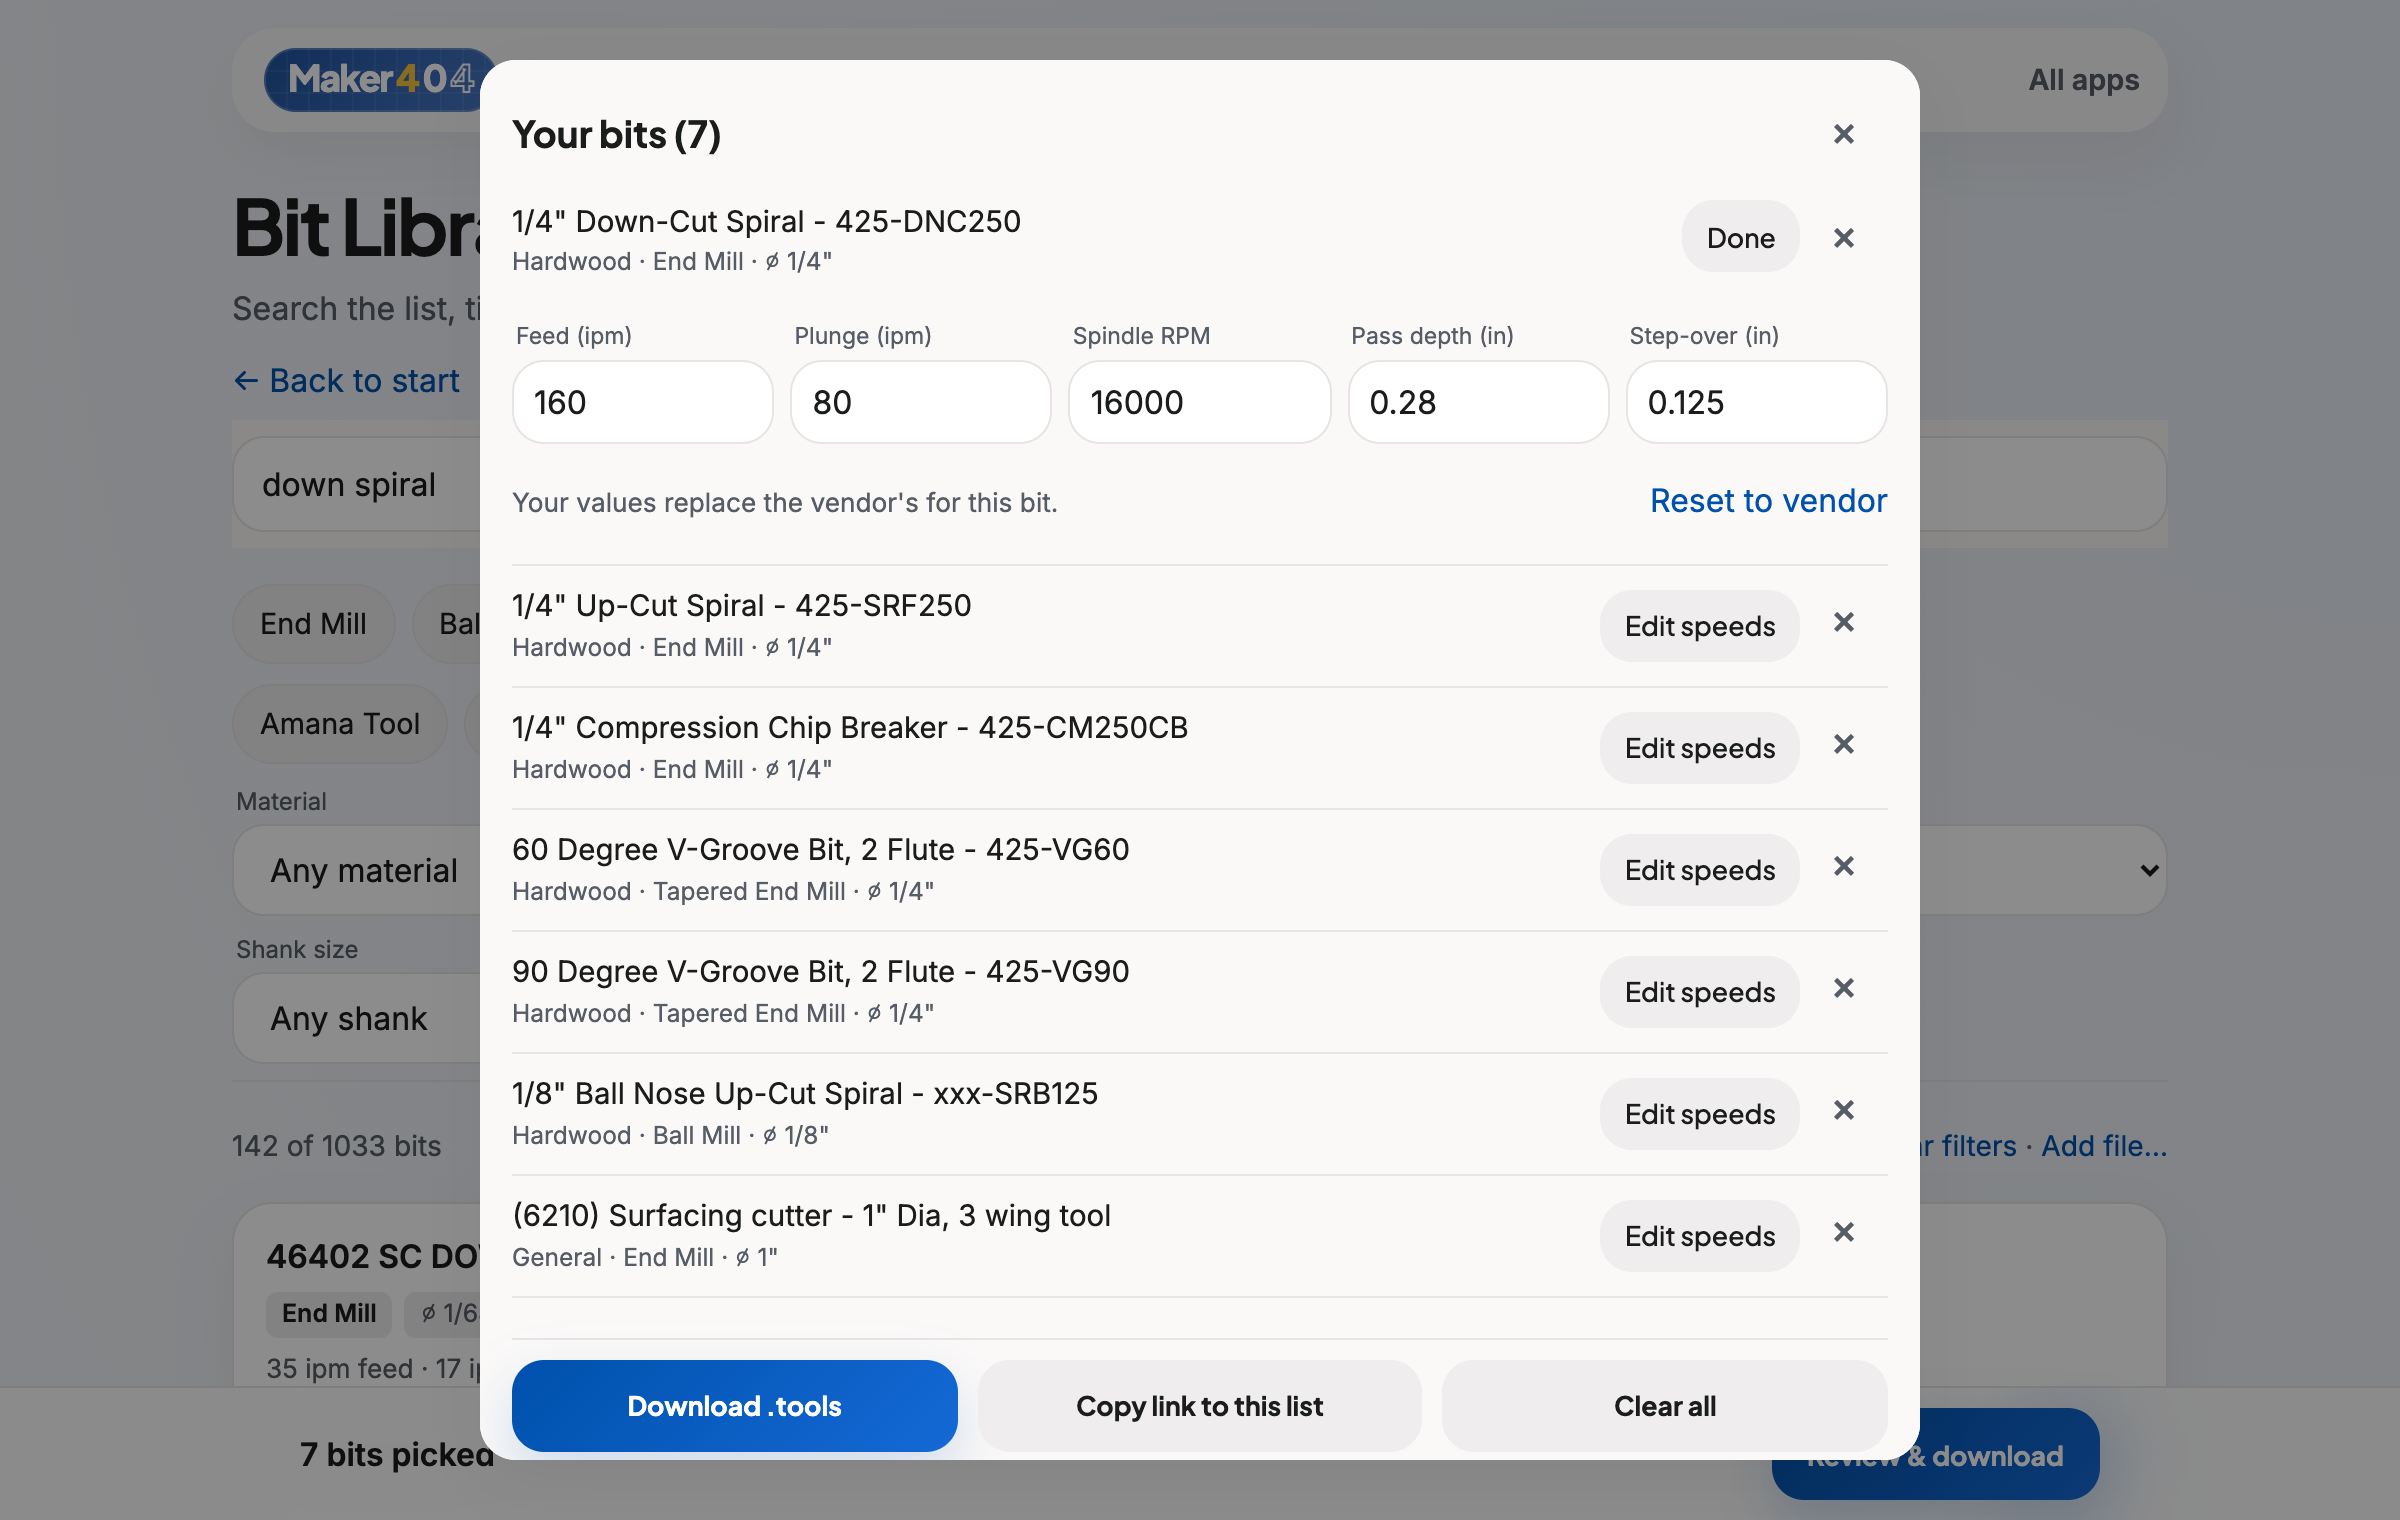
<p><img src="/assets/uploads/bit-library-builder-review.png" alt="The review panel in Bit Library Builder with editable feed, plunge, spindle RPM, pass depth, and step-over fields for one bit" /></p>

<p>When you are done picking, the review panel lists your bits. Press <strong>Edit speeds</strong> on any of them and you can change the feed, plunge rate, spindle RPM, pass depth, and step-over. There is a <strong>Reset to vendor</strong> button if you want to go back to the original numbers.</p>

<p>This matters for a classroom. Vendor numbers are written for a general machine. A hobby router or an older school CNC may need slower, safer values, and you can set those once for every student.</p>

<h3 id="options-that-save-time">Options that save time</h3>

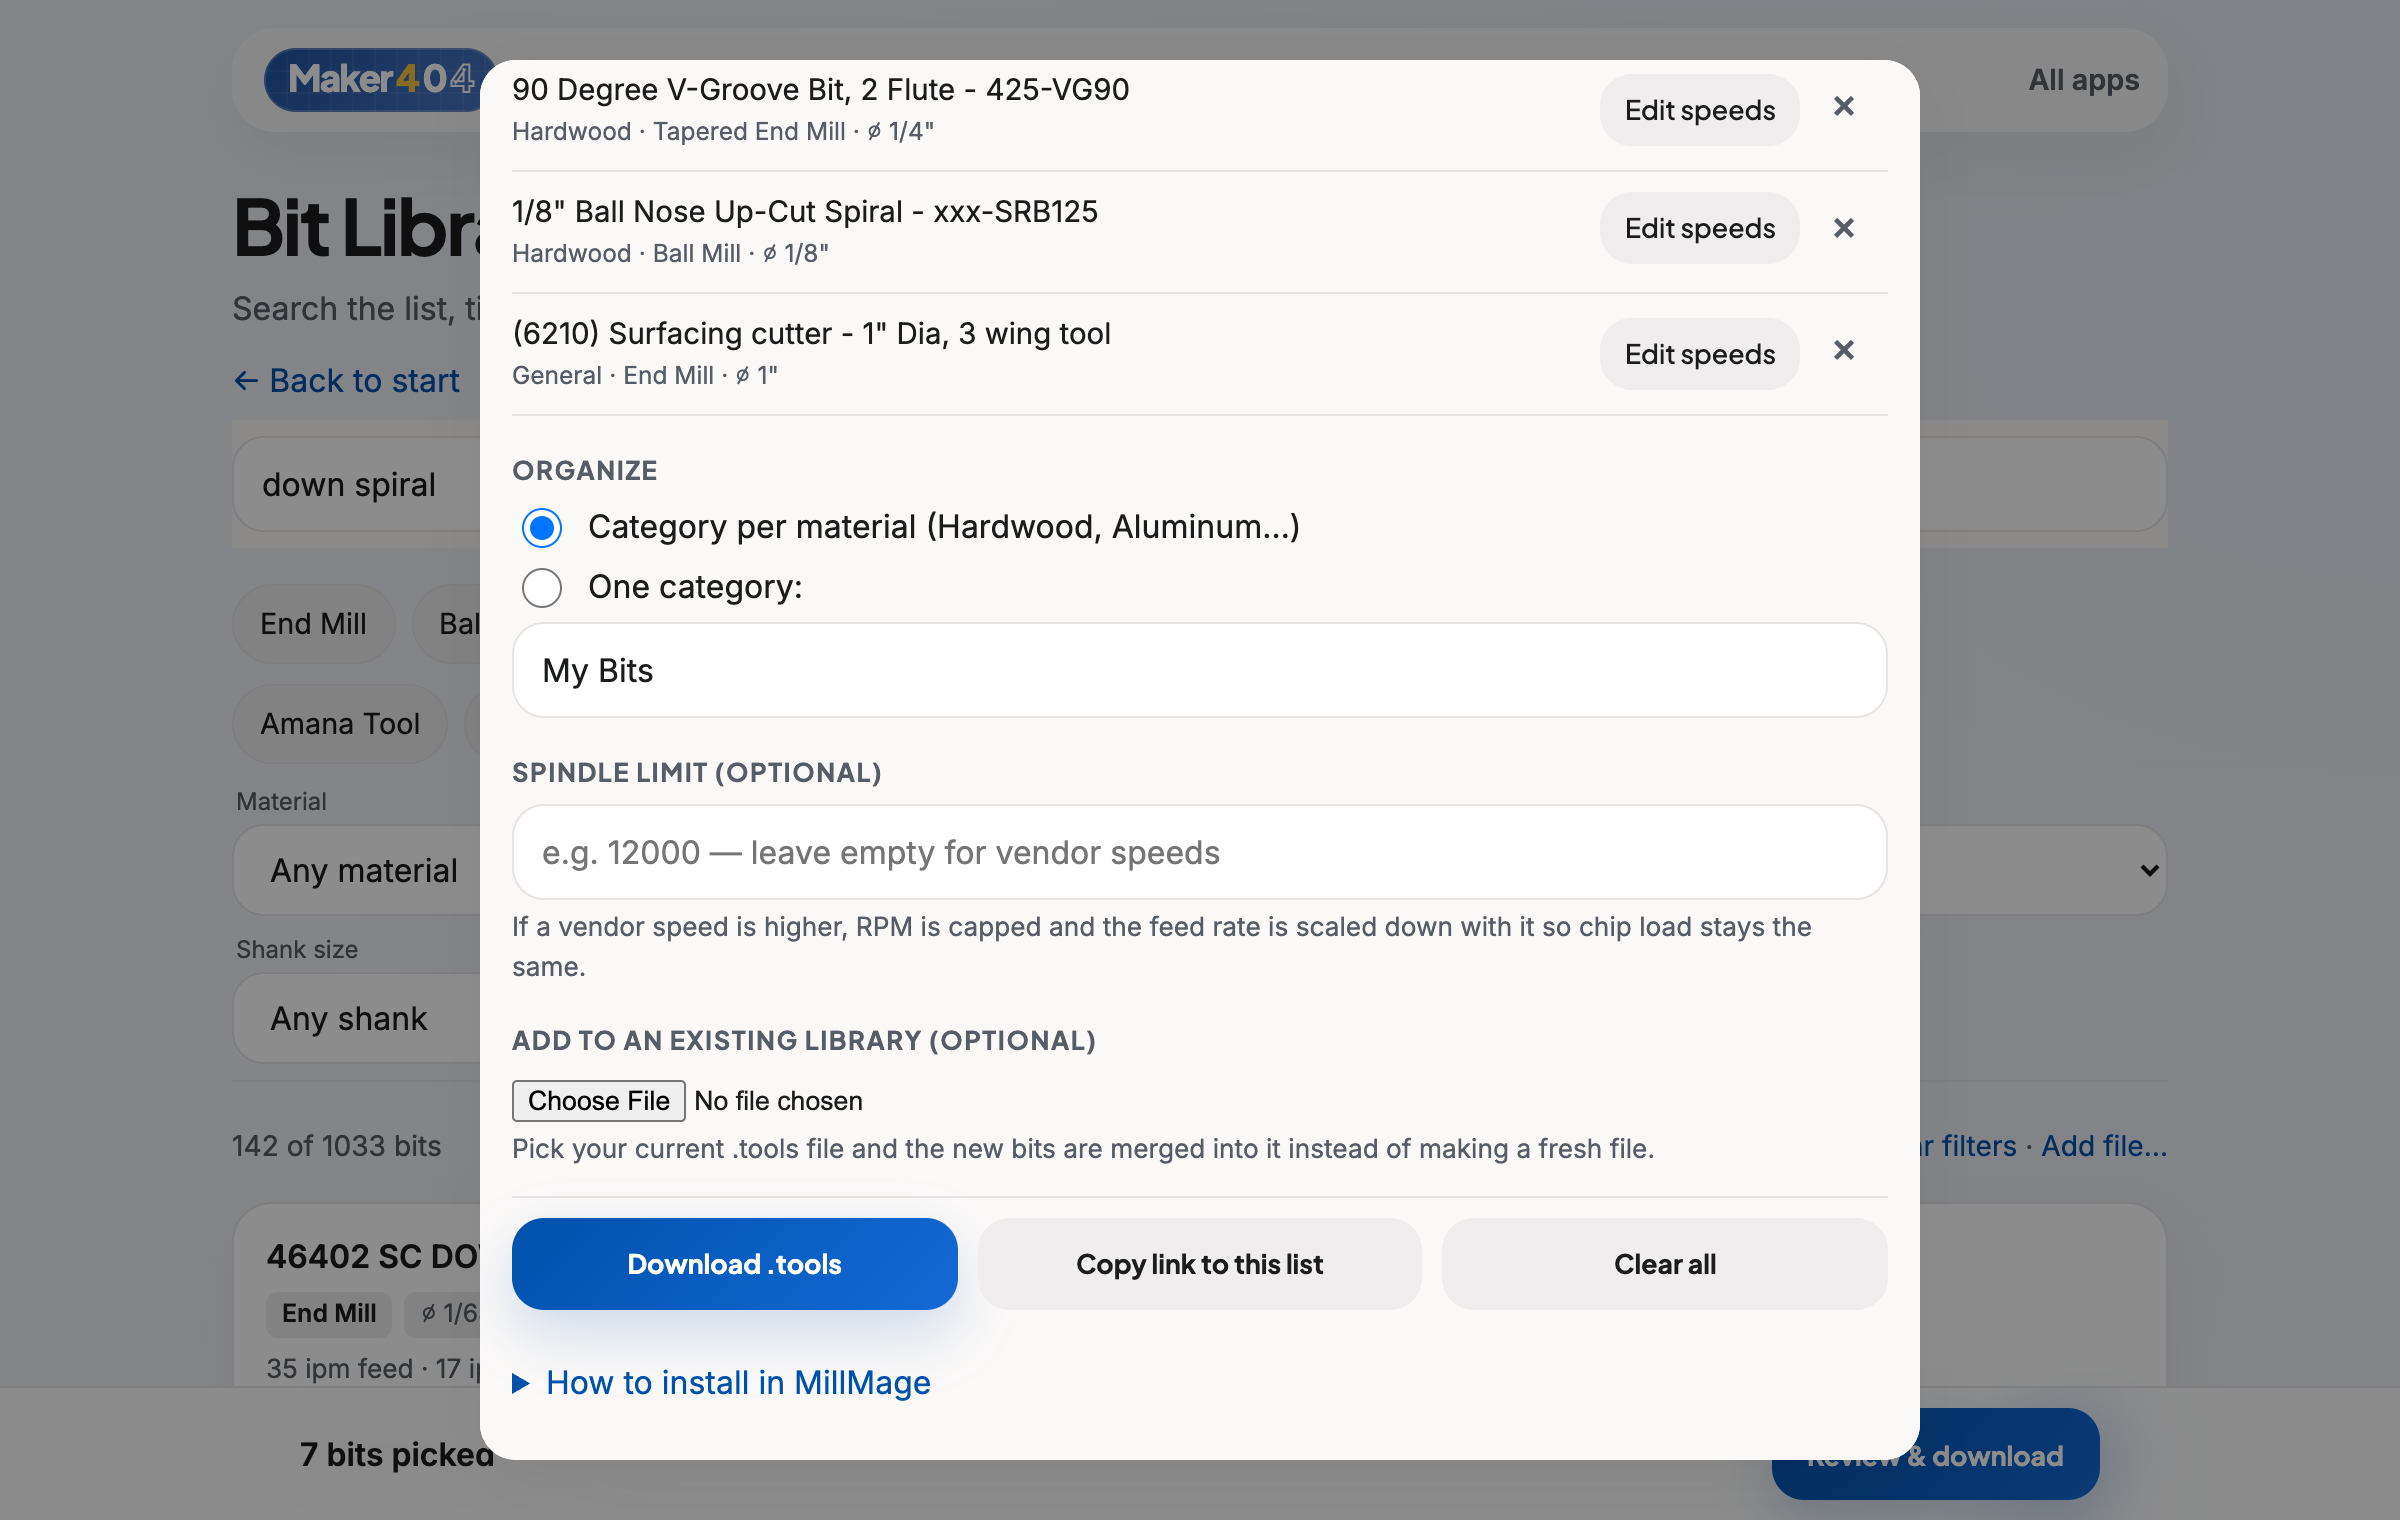
<p><img src="/assets/uploads/bit-library-builder-options.png" alt="The lower half of the review panel showing category options, a spindle speed limit, an option to add to an existing library, and the download button" /></p>

<ul>
  <li><strong>Organize by material or one category.</strong> Sort bits into categories like Hardwood and Aluminum, or put everything in one folder with your own name.</li>
  <li><strong>Spindle limit.</strong> If your spindle tops out at 12,000 RPM, enter that. Any vendor speed above it is capped, and the feed rate is scaled down with it so the chip load stays the same.</li>
  <li><strong>Add to an existing library.</strong> Choose your current <code class="language-plaintext highlighter-rouge">.tools</code> file and the new bits are merged into it. This is the feature I will use most at school when we buy new bits.</li>
  <li><strong>Copy link to this list.</strong> You get a link to your picks, which should make it easy to share a starter set with another teacher or your students.</li>
</ul>

<h2 id="how-to-install-the-file-in-millmage">How to install the file in MillMage</h2>

<ol>
  <li>Save the downloaded <code class="language-plaintext highlighter-rouge">.tools</code> file into <code class="language-plaintext highlighter-rouge">Documents/MillMage/ToolLibraries</code> on your computer.</li>
  <li>In MillMage, open the Tool Library and choose your file, or restart MillMage.</li>
  <li>Spot-check a few bits against the cutter in your hand.</li>
</ol>

<h2 id="your-files-stay-on-your-device">Your files stay on your device</h2>

<p>Everything runs in your browser tab. Files you add are read and converted on your own computer, and nothing is uploaded or stored on a server. There are no accounts and no tracking. Your picks are remembered only in that browser. For a school setting, that was a requirement for me.</p>

<h2 id="what-to-know-before-you-use-it">What to know before you use it</h2>

<ul>
  <li><strong>Feeds and speeds are starting points.</strong> They come from the vendors’ published libraries and are not tuned for your machine. Test in scrap first, especially on a classroom CNC.</li>
  <li><strong>Conversion is automatic.</strong> Spot-check anything important before you cut.</li>
  <li><strong>It is not official.</strong> Bit Library Builder is not affiliated with or endorsed by LightBurn, MillMage, or any of the bit vendors. It is a tool I made for my own use that I am sharing.</li>
</ul>

<p>If a bit imports wrong or you want another vendor added, there is a feedback link at the bottom of the tool, or you can reach me on the <a href="/contact/">contact page</a>.</p>

<h2 id="frequently-asked-questions">Frequently asked questions</h2>

<h3 id="does-millmage-work-with-an-older-cnc">Does MillMage work with an older CNC?</h3>
<p>I am still working this out for our school machine. I have run it on my Onefinity, and I will write up the older shop CNC once we have tested it. Check MillMage’s own documentation for supported controllers before you plan a classroom around it.</p>

<h3 id="do-my-students-need-to-know-lightburn-first">Do my students need to know LightBurn first?</h3>
<p>No. But if they already use it, I expect a shorter on-ramp, which is the whole reason I want to try this.</p>

<h3 id="can-i-use-bits-that-are-not-on-the-list">Can I use bits that are not on the list?</h3>
<p>Yes. You can upload your own library from Fusion 360, Vectric, or Carbide Create, or add a vendor file you download yourself.</p>

<h3 id="is-bit-library-builder-free">Is Bit Library Builder free?</h3>
<p>Yes. It is free, with no account.</p>

<h2 id="whats-next">What’s next</h2>

<p>I will keep building my MillMage lessons this fall and start teaching them in the second trimester. When students have tried it, I will share what transferred from LightBurn, what did not, and how long the first project took. In the meantime, you can try <strong><a href="https://bits.maker404.com/">Bit Library Builder</a></strong> and browse more free classroom tools on the <a href="/apps/">Maker404 apps page</a>.</p>]]></content><author><name>James Crawford</name></author><category term="Classroom Tech" /><category term="Apps &amp; Tools" /><summary type="html"><![CDATA[Planning to teach MillMage in a school woodshop after LightBurn? Here is why same-developer software shortens lessons, plus a free tool to build your MillMage bit library.]]></summary><media:thumbnail xmlns:media="http://search.yahoo.com/mrss/" url="https://maker404.com/assets/uploads/bit-library-builder-search.png" /><media:content medium="image" url="https://maker404.com/assets/uploads/bit-library-builder-search.png" xmlns:media="http://search.yahoo.com/mrss/" /></entry><entry><title type="html">Free Vocabulary Puzzles for Tech Ed: Reinforcement and Early Finisher Work</title><link href="https://maker404.com/2026/10/23/free-tech-ed-vocabulary-puzzles-reinforcement-and-early-finishers/" rel="alternate" type="text/html" title="Free Vocabulary Puzzles for Tech Ed: Reinforcement and Early Finisher Work" /><published>2026-10-23T00:00:00+00:00</published><updated>2026-10-23T00:00:00+00:00</updated><id>https://maker404.com/2026/10/23/free-tech-ed-vocabulary-puzzles-reinforcement-and-early-finishers</id><content type="html" xml:base="https://maker404.com/2026/10/23/free-tech-ed-vocabulary-puzzles-reinforcement-and-early-finishers/"><![CDATA[<p>Tech Ed is full of words students use for a week and then lose. Extruder, dado, iteration, variable. They show up on a worksheet, maybe a quiz, and then the unit ends. The students who can use the words correctly a month later are usually the ones who kept running into them.</p>

<p>I wanted a low-stakes way to keep running into them, so I made one. <strong><a href="/apps/tech-trails/">Tech Trails</a></strong> is a free word puzzle for Tech Ed classes. It runs in any browser, including school Chromebooks, and there is nothing to sign up for.</p>

<h2 id="how-it-works">How it works</h2>

<p>Each puzzle is a grid of letters with a theme, like “Inside a 3D printer” or “Staying safe in the shop.” Students drag across touching letters to spell the hidden words. Letters can connect in any direction, and every letter on the board belongs to exactly one word.</p>

<p>One word is special. It’s the rainbow word, and it runs from the top of the board to the bottom. It’s usually the big idea for the theme, like ALGORITHM for a coding puzzle or PROTOTYPE for the design process.</p>

<p>I made it because my students already love themed word games, and I wanted that same pull for vocabulary I’m trying to teach. Tech Trails is its own thing and isn’t affiliated with any of those games.</p>

<h2 id="four-topics-19-puzzles">Four topics, 19 puzzles</h2>

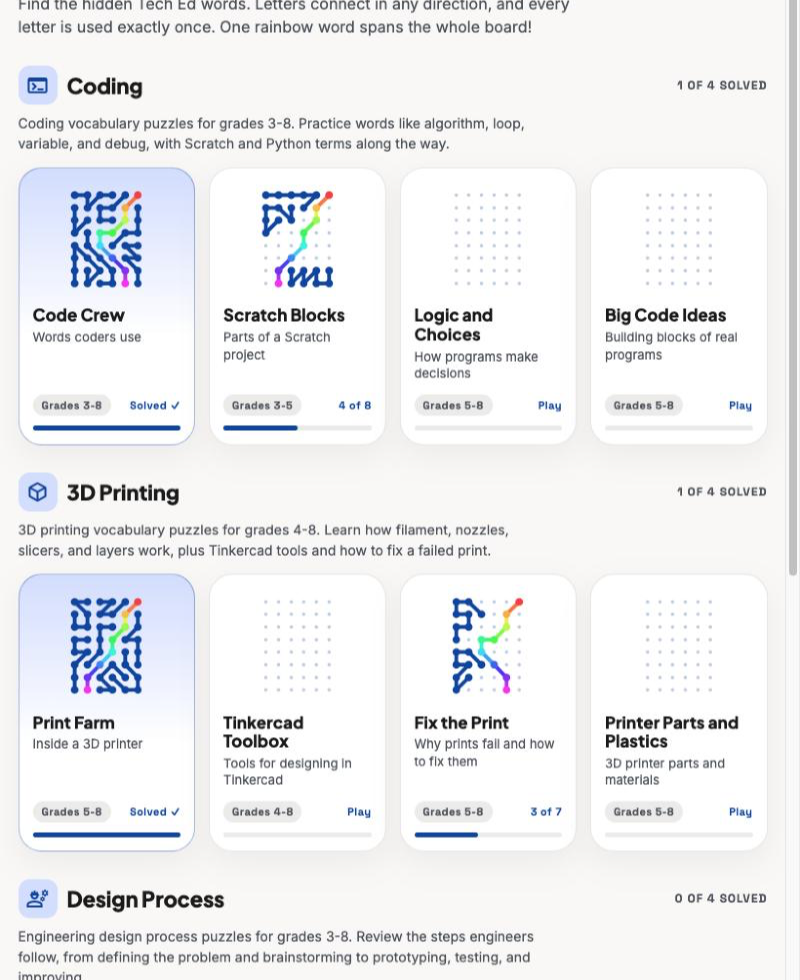
<p><img src="/assets/uploads/tech-trails-picker.png" alt="Tech Trails puzzle picker showing the Coding and 3D Printing sections, with tiles that fill in as students solve words" /></p>

<p>The puzzles are grouped by topic, and each tile shows a mini board that fills in as students find words.</p>

<ul>
  <li><strong>Coding (4 puzzles):</strong> algorithm, loop, variable, debug, Scratch blocks, conditions, functions, and Python basics.</li>
  <li><strong>3D Printing (4 puzzles):</strong> filament, nozzle, slicer, Tinkercad tools, failed print problems, and printer parts and plastics.</li>
  <li><strong>Design Process (4 puzzles):</strong> define, brainstorm, prototype, test, improve, plus constraints like budget and deadline.</li>
  <li><strong>Wood Shop (7 puzzles):</strong> hand tools, power tools and machines, shop safety, Northeast woods, lumber terms, joints like dovetails and mortise and tenon, and measuring and marking.</li>
</ul>

<p>Puzzles are labeled for roughly grades 3 to 8. Those labels are my best guess, not a tested reading level.</p>

<h2 id="how-i-use-it-in-my-classroom">How I use it in my classroom</h2>

<p>I have been using Tech Trails two ways.</p>

<p><strong>Reinforcement.</strong> Once we’ve covered a topic, students can do the matching puzzle. It gets the vocabulary back in front of them in a different way than a worksheet does, and it feels more like a game than a quiz.</p>

<p><strong>Extension for early finishers.</strong> Every class has students who finish before everyone else. A puzzle gives them something that is still about the content but doesn’t need me to set anything up. They can pick any topic, so a student who just finished a 3D printing project can do a coding puzzle next.</p>

<p>A few other ways it could fit that I think are worth trying:</p>

<ul>
  <li>A warm-up at the start of class.</li>
  <li>A station in a rotation.</li>
  <li>Sub plans, since students already know how to use it.</li>
  <li>A quick check of which words stuck before a unit test.</li>
</ul>

<h2 id="every-word-comes-with-a-definition">Every word comes with a definition</h2>

<p>Whenever a student finds a word, a plain-language definition shows up next to the board. Finding KICKBACK also tells them that it’s when a machine throws a board back at you, and that guards and the right stance help prevent it. That matters more to me than the game part. A student can only find the word by spelling it correctly, and they get the meaning right when they find it.</p>

<h2 id="easy-mode">Easy mode</h2>

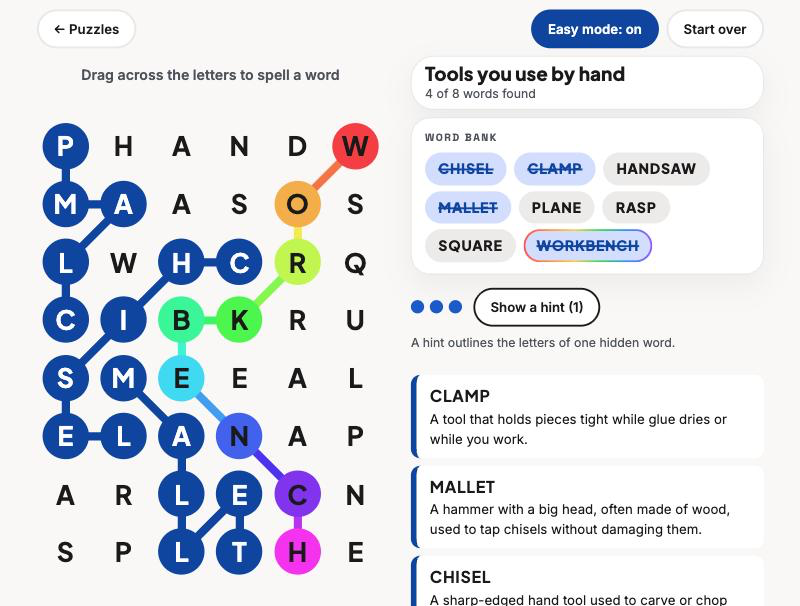
<p><img src="/assets/uploads/tech-trails-easy-mode.png" alt="Tech Trails on a laptop screen with Easy mode on, showing a word bank beside the letter grid and found words crossed off" /></p>

<p>Turn on <strong>Easy mode</strong> and a word bank appears next to the board, with found words crossed off. It’s a good fit for younger students, students new to the vocabulary, or anyone who got stuck. The rainbow word is outlined in the bank so students know which one spans the board.</p>

<p>With Easy mode off, students have to come up with the words themselves. If they get stuck, every three guesses earns a hint that outlines the letters of one hidden word.</p>

<h2 id="made-for-a-real-class-period">Made for a real class period</h2>

<ul>
  <li><strong>Chromebook friendly.</strong> On a wide screen, the board sits on the left and the theme, word bank, hints, and definitions sit on the right, so students should rarely need to scroll. It also works on phones and tablets.</li>
  <li><strong>No accounts, no ads.</strong> I don’t collect any student information. Progress is saved only in the browser on that device, so students pick up where they left off on the same computer.</li>
  <li><strong>Self-paced.</strong> Students move through at their own speed, so I don’t have to manage the activity.</li>
</ul>

<h2 id="how-i-built-it">How I built it</h2>

<p>I wrote the topics and the target grade levels. Claude helped me draft the word lists and definitions, and I review them as the teacher. A small script lays out every board so that each letter is used once and no two word paths cross. Then I played the puzzles myself and kept changing things. I added Easy mode, made dragging back over your path erase letters, and swapped out two star words that would have gotten a lot of giggles in a middle school classroom.</p>

<h2 id="what-im-still-figuring-out">What I’m still figuring out</h2>

<p>I have mostly used it in my own classes, so I don’t have good numbers on how long a puzzle takes or which ones are too hard. The definitions and the Northeast wood list come from general knowledge, so a wood shop teacher should check them against their own shop. If you try it and a word is wrong, too hard, or missing from your curriculum, please tell me on the <a href="/contact/">contact page</a>. I’d also like to hear what topics you want next. Electronics, robotics, and CAD are on my list.</p>

<h2 id="try-it">Try it</h2>

<p>Play it free at <strong><a href="/apps/tech-trails/">Tech Trails</a></strong>. For a first try, I’d pick the topic you just finished teaching and turn on Easy mode. You can find more free classroom tools on the <a href="/apps/">Maker404 apps page</a>.</p>]]></content><author><name>James Crawford</name></author><category term="Apps &amp; Tools" /><category term="STEM Lessons" /><category term="AI + Making" /><summary type="html"><![CDATA[Tech Trails is a free word puzzle for Tech Ed classes. 19 puzzles on coding, 3D printing, the design process, and wood shop, with a definition for every word.]]></summary><media:thumbnail xmlns:media="http://search.yahoo.com/mrss/" url="https://maker404.com/assets/app-previews/tech-trails-2.png" /><media:content medium="image" url="https://maker404.com/assets/app-previews/tech-trails-2.png" xmlns:media="http://search.yahoo.com/mrss/" /></entry><entry><title type="html">Why I Built a Second Bridge Game: Running a Construction Company Wasn’t Enough</title><link href="https://maker404.com/2026/10/19/why-i-built-bridge-lab-running-a-construction-company-was-not-enough/" rel="alternate" type="text/html" title="Why I Built a Second Bridge Game: Running a Construction Company Wasn’t Enough" /><published>2026-10-19T00:00:00+00:00</published><updated>2026-10-19T00:00:00+00:00</updated><id>https://maker404.com/2026/10/19/why-i-built-bridge-lab-running-a-construction-company-was-not-enough</id><content type="html" xml:base="https://maker404.com/2026/10/19/why-i-built-bridge-lab-running-a-construction-company-was-not-enough/"><![CDATA[<p>A few days ago I <a href="/2026/10/15/free-bridge-building-game-for-kids-lemonade-stand-meets-oregon-trail/">shared Bridge Building Company</a>, a game where students run a small construction company and pick a bridge for each job site. I like it. But once I started using it in class, I noticed what was missing.</p>

<p>In that game, the bridge is a menu choice. Students pick a beam, truss, arch, or suspension bridge, and the game tells them whether it held. They learn which bridge fits which site. They never get to ask the more interesting question: <strong>why does a bridge hold or fail?</strong></p>

<p>A bridge unit has two halves. One is deciding: what kind of bridge, what budget, what risks. The other is designing: where do the beams go, which ones carry the load, and what happens when one is too weak. The first game covered the first half. I wanted something for the second.</p>

<h2 id="where-the-idea-came-from">Where the idea came from</h2>

<p>I found two free bridge-designer games online and played them for a while. They were fun, and they showed me what a design game does well: you build something, test it, watch it fail, and fix it. I did not want to copy them, so I studied how they worked and built my own version around the things I care about in a tech ed room: plain language, a budget that matters, and a clear answer to “what broke, and why?”</p>

<p>I also asked myself whether this should be part of the first game or a separate one. I decided it should be both. Each game has a switcher in the header, so students can move between <strong>Run the company</strong> and <strong>Design a bridge</strong> whenever they want.</p>

<h2 id="bridge-lab-design-it-test-it-fix-it">Bridge Lab: design it, test it, fix it</h2>

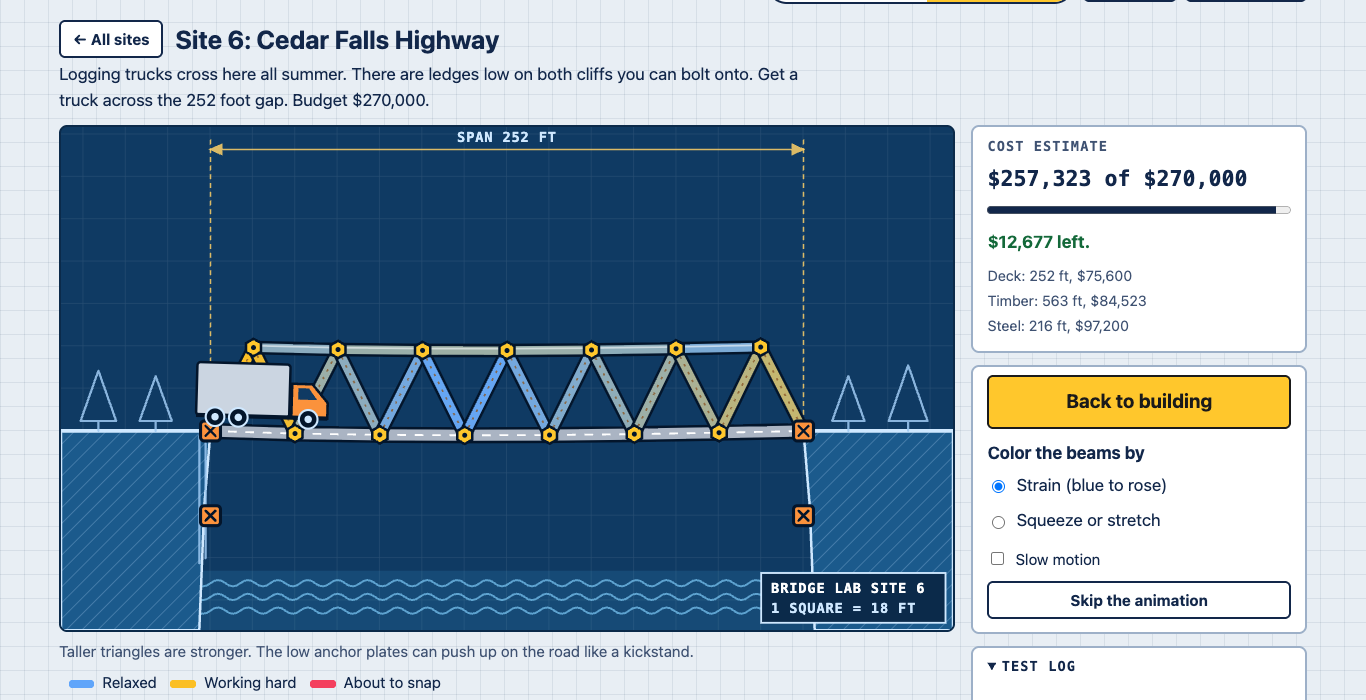
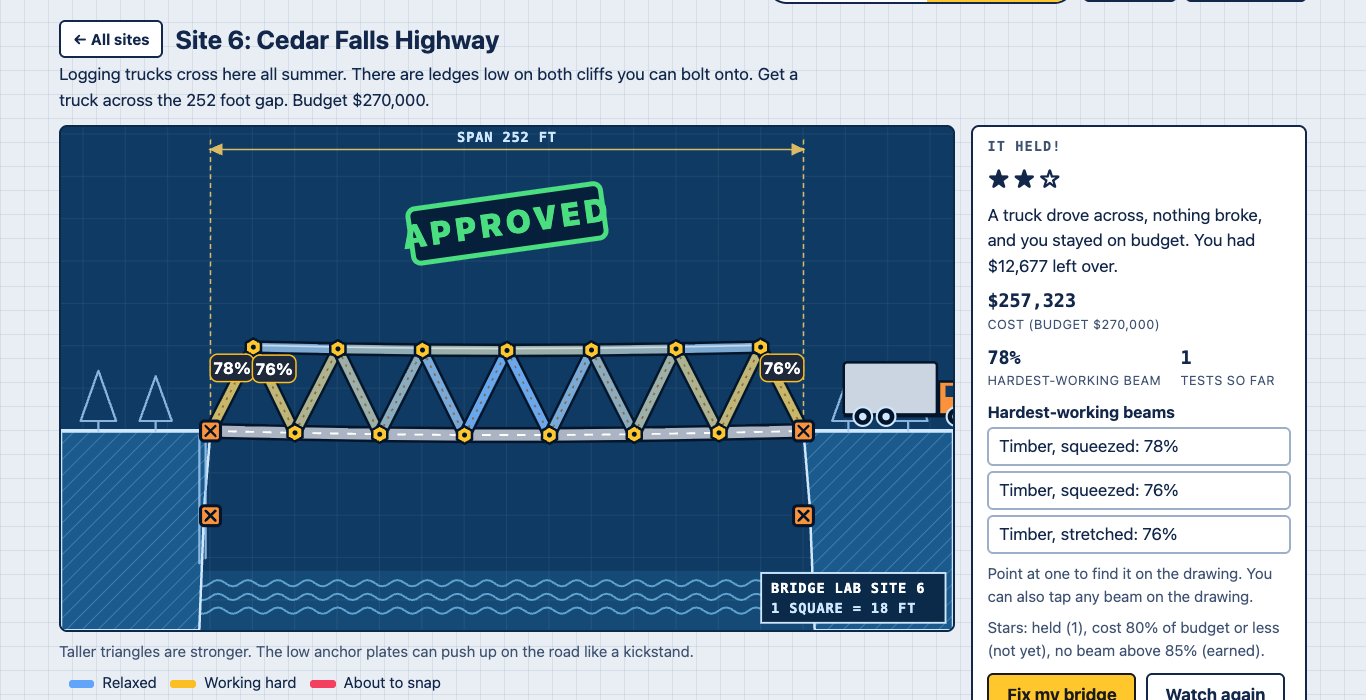
<p><strong><a href="/apps/bridge-lab/">Bridge Lab</a></strong> gives students a job site, a budget, and a vehicle that has to cross. They draw a bridge from deck, timber, steel, and cable, then press Test and watch a truck, car, train, or walking group drive over it.</p>

<p><img src="/assets/uploads/bridge-lab-truck-test.png" alt="A truck crossing a truss bridge in Bridge Lab, with the beams colored from blue to amber by how hard they are working" /></p>

<p>The beams change color as they work harder, from blue to amber to rose. When something breaks, the drawing points to the beam that snapped first and says whether it was being squeezed or stretched. “My bridge broke” turns into a question students can answer: which beam failed, and what would share its load?</p>

<p><img src="/assets/uploads/bridge-lab-approved.png" alt="The Approved stamp and result panel after a bridge holds in Bridge Lab" /></p>

<p>There are eight sites, from a 40-foot footbridge to an 1,800-foot harbor crossing. Every site has a budget, and a bridge that holds but costs too much does not pass. That is the part I wanted most. It brings back the trade-offs from the first game, but now students feel them in their own design: triangles share load, timber is cheap, steel is strong, and cables only pull.</p>

<h2 id="what-i-learned-by-watching-kids-try-it">What I learned by watching kids try it</h2>

<p>Design games are hard. When students tried Bridge Lab, most of them went over budget to get a bridge that worked. A game that frustrates students is not much of a reinforcement tool, so I added help. After two tests that did not work, Bridge Lab offers a hint for that site. After three, it can show a working design, which students can then try to make cheaper.</p>

<p>That one change made the game much easier to hand to a whole class.</p>

<h2 id="how-the-two-games-work-together">How the two games work together</h2>

<p>I think of them as two halves of the same unit:</p>

<ul>
  <li><strong>Bridge Building Company</strong> is about <em>choosing</em>. Which bridge fits this span, ground, and traffic? What does it cost in money and time?</li>
  <li><strong>Bridge Lab</strong> is about <em>designing</em>. Where do the beams go, and which ones are working too hard?</li>
</ul>

<p>A student who has played both has seen the same ideas from two directions. In the company game, “a truss is a good all-around choice” is a fact. In Bridge Lab, it is something they discover when the triangles hold and the flat road sags.</p>

<h2 id="how-i-use-them-in-class">How I use them in class</h2>

<p><strong>As reinforcement.</strong> After a lesson on bridge types and forces, I put the whole class on one of the games for part of a period. The loops are short, failure is free, and the vocabulary (span, deck, tension, compression, truss) shows up in use instead of on a worksheet.</p>

<p><strong>As extension work for early finishers.</strong> A student who finishes the hands-on build does not wait around, and I do not have to invent a task on the spot. A student who likes decisions can try Challenge mode in Bridge Building Company. A student who likes building can chase three stars in Bridge Lab by lowering the cost without overstressing any beam. The later sites, with cables hung from towers, keep the strongest students busy for a while.</p>

<p>A few things make it easier:</p>

<ul>
  <li>Start the company game in <strong>Easy mode</strong>, then move students to Challenge once they know the vocabulary.</li>
  <li>Add a seed like <code class="language-plaintext highlighter-rouge">?seed=OAK-417</code> to the Bridge Building Company link so the whole class gets the same sites and events and can compare choices.</li>
  <li>Ask one question after a test: “Which beam worked hardest, and what could make it work less?”</li>
  <li>Both games run on Chromebooks, need no accounts, and send nothing anywhere. Bridge Lab saves a student’s designs on that device only.</li>
</ul>

<h2 id="what-im-still-figuring-out">What I’m still figuring out</h2>

<p>I use these as a teacher, not a researcher. I have not measured learning gains, and I have not tested the games on every kind of device. If something confuses your students, I would like to hear about it. You can reach me on the <a href="/contact/">contact page</a>.</p>

<h2 id="try-them">Try them</h2>

<ul>
  <li><strong><a href="/apps/bridge-building-company/">Bridge Building Company</a></strong>: pick the right bridge for the site and the budget.</li>
  <li><strong><a href="/apps/bridge-lab/">Bridge Lab</a></strong>: design a bridge, test it, and fix what breaks.</li>
</ul>

<p>For a hands-on build to go with them, try the <a href="/404-challenges/bridge-builder-challenge/">Bridge Builder Challenge</a>. More free classroom tools are on the <a href="/apps/">Maker404 apps page</a>.</p>]]></content><author><name>James Crawford</name></author><category term="STEM Lessons" /><category term="Apps &amp; Tools" /><summary type="html"><![CDATA[Bridge Building Company teaches students to choose a bridge. Bridge Lab lets them design and test one. Here is why I added it, and how I use both in tech ed.]]></summary><media:thumbnail xmlns:media="http://search.yahoo.com/mrss/" url="https://maker404.com/assets/app-previews/bridge-lab-social.png" /><media:content medium="image" url="https://maker404.com/assets/app-previews/bridge-lab-social.png" xmlns:media="http://search.yahoo.com/mrss/" /></entry><entry><title type="html">A Free Bridge Building Game for Kids: Lemonade Stand Meets Oregon Trail</title><link href="https://maker404.com/2026/10/15/free-bridge-building-game-for-kids-lemonade-stand-meets-oregon-trail/" rel="alternate" type="text/html" title="A Free Bridge Building Game for Kids: Lemonade Stand Meets Oregon Trail" /><published>2026-10-15T00:00:00+00:00</published><updated>2026-10-15T00:00:00+00:00</updated><id>https://maker404.com/2026/10/15/free-bridge-building-game-for-kids-lemonade-stand-meets-oregon-trail</id><content type="html" xml:base="https://maker404.com/2026/10/15/free-bridge-building-game-for-kids-lemonade-stand-meets-oregon-trail/"><![CDATA[<p>A bridge unit asks students to do something that’s hard to practice with popsicle sticks alone: weigh cost, time, and safety at the same time. Real engineers don’t get to build the strongest possible bridge. They build the right bridge for the site and the budget.</p>

<p>So I made a game for it. <strong><a href="/apps/bridge-building-company/">Bridge Building Company</a></strong> is a free, text-and-picture game that runs in any browser, including school Chromebooks. Students run a small construction company, take on three job sites, and try to finish on time and under budget with a bridge that holds.</p>

<h2 id="lemonade-stand-meets-oregon-trail">Lemonade Stand meets Oregon Trail</h2>

<p>The game borrows from two classics. From Lemonade Stand it takes the loop of buying supplies, setting a price, running the day, and checking the profit. Here the “price” is crew pay, and the profit is whether you stayed under budget. From Oregon Trail it takes event cards: something goes wrong, you choose a response, and every choice costs something.</p>

<p>At each site, students:</p>

<ol>
  <li>Read the site card (span, ground, traffic, budget, deadline).</li>
  <li>Pick a bridge.</li>
  <li>Buy materials and spare supplies.</li>
  <li>Set crew pay: low, fair, or high.</li>
  <li>Run the build day by day, handling events like heavy rain, a late steel shipment, or a grumbling crew.</li>
  <li>Watch the load test.</li>
</ol>

<h2 id="four-bridges-six-sites">Four bridges, six sites</h2>

<p><img src="/assets/uploads/bridge-building-company-bridge-types.png" alt="Beam, truss, arch, and suspension bridge drawings side by side" /></p>

<p>Students choose from a beam, truss, arch, or suspension bridge. Each one has a different cost, speed, and strength, and each fits some sites better than others. There are six sites, from a 40-foot footbridge over a creek to an 1,800-foot harbor crossing. A run uses three of them, so a classroom can play it in one sitting.</p>

<p>The sites are what make the choice interesting. A beam is cheap and fast, and it’s perfect for the footbridge. It can’t reach across a gorge, and it’s not strong enough for a train. An arch loves solid rock but is a risky pick on soft ground.</p>

<h2 id="what-it-teaches">What it teaches</h2>

<ul>
  <li>Matching a bridge type to a site’s span, ground, and traffic.</li>
  <li>Seeing the trade-offs among cost, time, and safety.</li>
  <li>Naming tension and compression, the forces that decide whether a bridge holds. A built-in glossary explains the words in plain language.</li>
</ul>

<p>It pairs well with a hands-on build. If you want students to test their own bridges first, try the <a href="/404-challenges/bridge-builder-challenge/">Bridge Builder Challenge</a>, then let them see how the same ideas play out in the game.</p>

<h2 id="easy-mode-and-challenge-mode">Easy mode and Challenge mode</h2>

<p>In <strong>Easy mode</strong>, each bridge gets a risk label, bridges that are too short can’t be picked, and the bridge always holds. If the design is risky, the bridge sags and creaks during the load test, and the game calls it a close call.</p>

<p>In <strong>Challenge mode</strong> there are no hints. A weak design can collapse at the load test, and then a failure report explains what went wrong, which forces were involved, and what a better choice would have been.</p>

<p><img src="/assets/uploads/bridge-building-company-collapse.png" alt="A bridge broken in the middle after a failed load test" /></p>

<h2 id="made-for-a-real-class-period">Made for a real class period</h2>

<ul>
  <li><strong>Chromebook friendly.</strong> It’s a small static page. No accounts, no ads, no trackers, and nothing is saved or sent anywhere.</li>
  <li><strong>Same seed, same run.</strong> Add something like <code class="language-plaintext highlighter-rouge">?seed=OAK-417</code> to the link and every student gets the same sites and events, so the class can compare choices afterward.</li>
  <li><strong>An optional engineer’s log.</strong> After each site, students can answer three short prompts and print the page. It’s optional, and a teacher can turn it off by adding <code class="language-plaintext highlighter-rouge">log=off</code> to the link.</li>
  <li><strong>Keyboard and touch.</strong> It plays with a keyboard, a trackpad, or a touch screen.</li>
</ul>

<h2 id="how-i-built-it">How I built it</h2>

<p>I wrote the rules first: the bridge types, costs, event cards, and scoring, all in plain data files so I can tune the game without touching code. Then I used Claude Code to build it from that written plan, including tests for the math. After I played it, I changed a few things. I slowed the build days way down, made the writing optional, and asked for the graphics to be cleaned up. Playing it myself caught things the plan never would have.</p>

<h2 id="what-im-still-figuring-out">What I’m still figuring out</h2>

<p>I haven’t run it with a full class yet. My guess is a three-site run takes 10 to 15 minutes, but I won’t know until students try it. The time per day is adjustable (5, 7, or 10 seconds), and you can add a fourth site with <code class="language-plaintext highlighter-rouge">sites=A,C,D,E</code> if a class finishes early. If you try it with students, I’d love to hear how long it took and where they got stuck. You can reach me on the <a href="/contact/">contact page</a>.</p>

<h2 id="try-it">Try it</h2>

<p>Play it free at <strong><a href="/apps/bridge-building-company/">Bridge Building Company</a></strong>. For a first try, I’d pick Easy mode and a seed like <code class="language-plaintext highlighter-rouge">OAK-417</code>. You can find more free classroom tools on the <a href="/apps/">Maker404 apps page</a>.</p>]]></content><author><name>James Crawford</name></author><category term="STEM Lessons" /><category term="AI + Making" /><category term="Apps &amp; Tools" /><summary type="html"><![CDATA[Bridge Building Company is a free browser game where students pick a bridge, manage a budget and crew, and run a load test. Built for a 5th grade bridge unit.]]></summary><media:thumbnail xmlns:media="http://search.yahoo.com/mrss/" url="https://maker404.com/assets/app-previews/bridge-building-company-social.png" /><media:content medium="image" url="https://maker404.com/assets/app-previews/bridge-building-company-social.png" xmlns:media="http://search.yahoo.com/mrss/" /></entry><entry><title type="html">Stop Downloading 30 STL Files One at a Time</title><link href="https://maker404.com/2026/10/12/stop-downloading-30-stl-files-one-at-a-time/" rel="alternate" type="text/html" title="Stop Downloading 30 STL Files One at a Time" /><published>2026-10-12T00:00:00+00:00</published><updated>2026-10-12T00:00:00+00:00</updated><id>https://maker404.com/2026/10/12/stop-downloading-30-stl-files-one-at-a-time</id><content type="html" xml:base="https://maker404.com/2026/10/12/stop-downloading-30-stl-files-one-at-a-time/"><![CDATA[<p>Every year my 3D printing unit ends the same way. Students design keychains in Tinkercad, export an STL, and turn it in through Google Classroom. Then I sit down to check about 30 of them.</p>

<p>Classroom doesn’t know what to do with an STL file. All it shows is “No preview available.” So the routine was: download the file, open it, look at it, close it, delete it, and do it again 29 more times. It’s a slow way to spend an afternoon, and I still missed problems that only showed up once the printer was running.</p>

<p>So I built a fix for my own grading, and I’m sharing it because I doubt I’m the only one with this problem.</p>

<h2 id="what-it-does">What it does</h2>

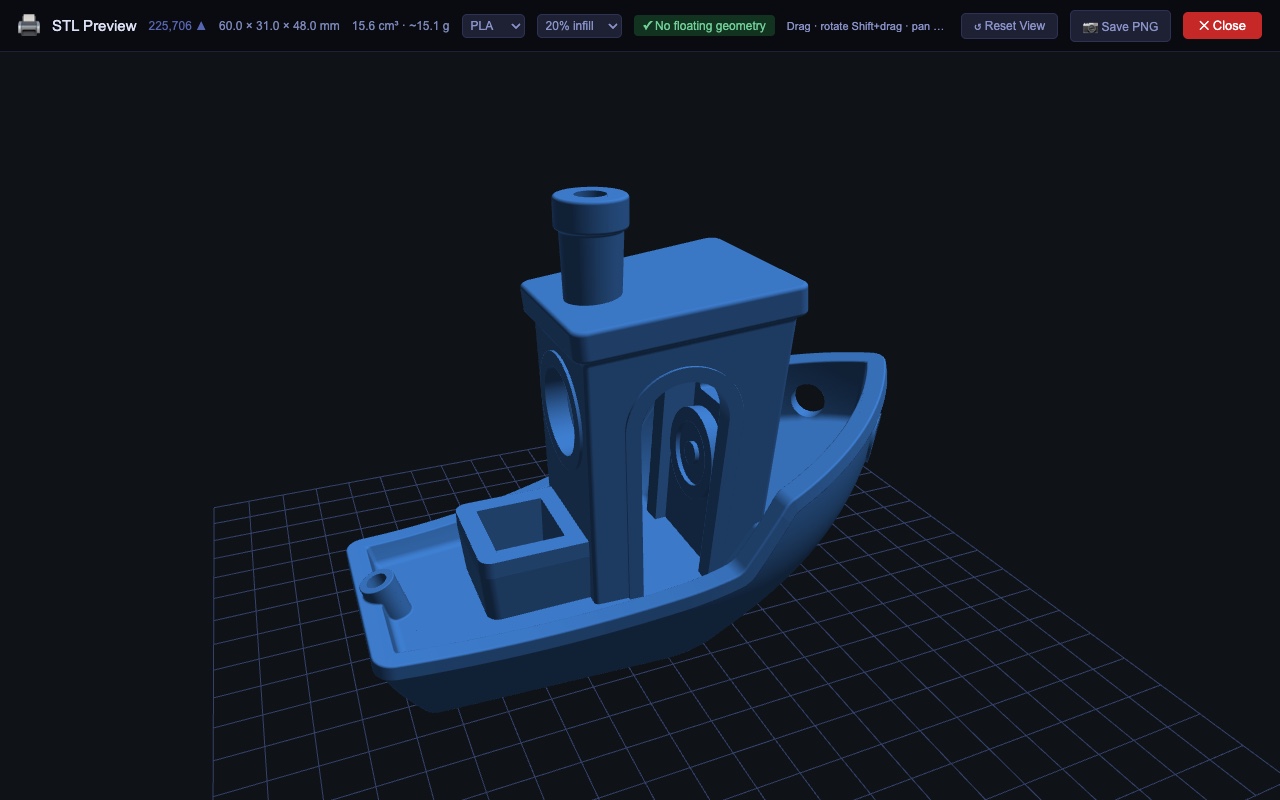
<p><strong>STL Viewer for Google Classroom</strong> is a free Chrome extension that adds a <strong>View in 3D</strong> button right under that “No preview available” message. One click opens a full-screen 3D viewer in your browser. Drag to rotate, Shift+drag to pan, scroll to zoom. Nothing gets downloaded, and you don’t need Tinkercad or a slicer.</p>

<p><img src="/assets/uploads/stl-viewer-3dbenchy.jpg" alt="STL Viewer showing 3DBenchy on a grid floor with size, weight, infill and a green no-floating-geometry badge in the toolbar" /></p>

<p>Models sit on the grid the way Tinkercad would print them, so a standing model stands up and a flat keychain lies flat.</p>

<h2 id="catching-print-failures-before-they-happen">Catching print failures before they happen</h2>

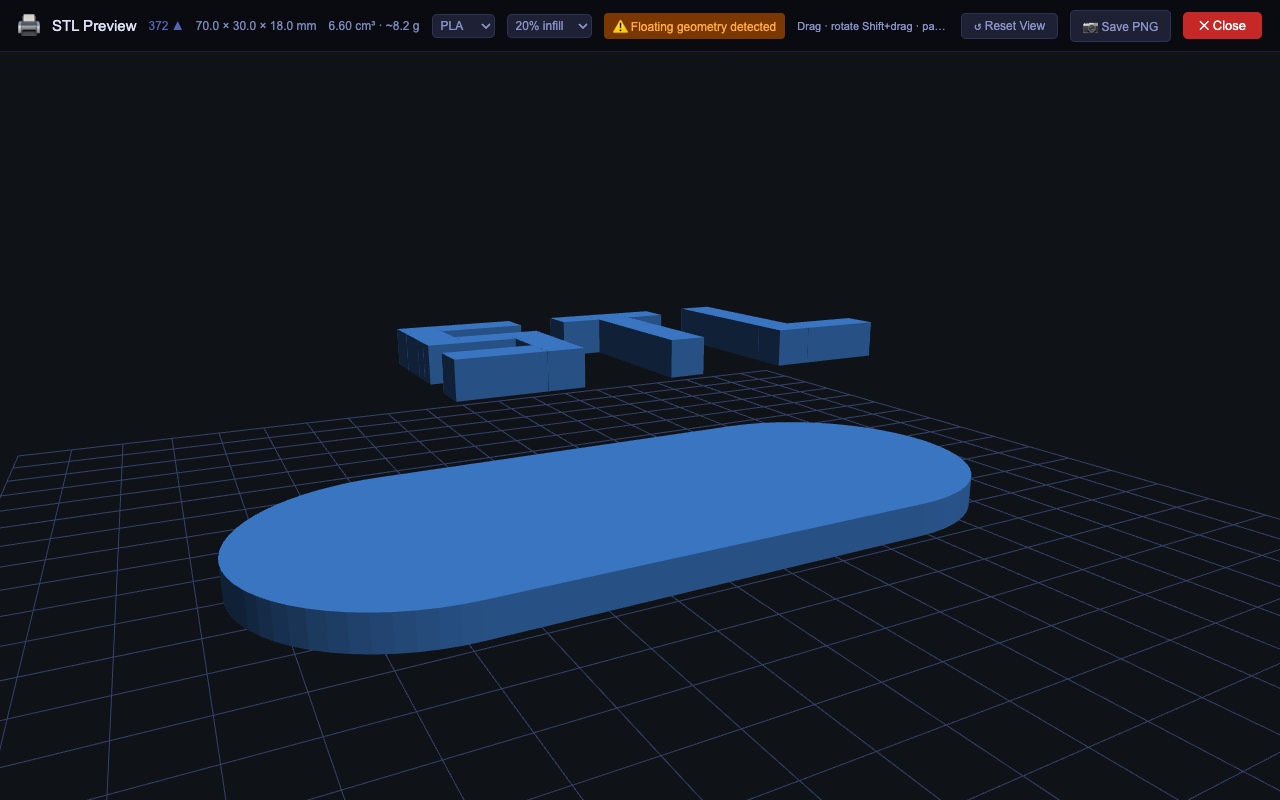
<p>The feature I use most is the floating geometry check. It runs the moment the viewer opens, and the toolbar shows either a green “No floating geometry” or an orange “Floating geometry detected.”</p>

<p>If you’ve taught this unit, you know the classic failure: a student sets letters slightly above the keychain plate, and the print comes out as a plate and a pile of spaghetti. Now I see it before anything goes to the printer.</p>

<p><img src="/assets/uploads/stl-viewer-floating-warning.jpg" alt="STL Viewer warning that the letters STL are floating above a keychain plate" /></p>

<p>Lettering that is inlaid in the body, or parts nested inside it, are not flagged, because those print fine. In my own testing, an early version wrongly flagged 6 of 41 real student files. After I fixed that, none of those 41 were flagged. It isn’t perfect. It can’t see a part floating inside a hollow body, for example. Think of it as a second pair of eyes, not a replacement for yours.</p>

<p>The toolbar also shows the size in millimeters (so you can check it fits your printer) plus the volume and an estimated filament weight for PLA or PETG at 10% to 100% infill. That weight is a rough estimate, and your slicer’s number will differ.</p>

<h2 id="feedback-for-students">Feedback for students</h2>

<p><strong>Save PNG</strong> exports the current view, toolbar info included, as an image named after the student’s file. Sending a kid a picture that says “these letters are floating, fix it before we print” beats a vague comment every time.</p>

<h2 id="planning-the-print-run">Planning the print run</h2>

<p>There’s also an optional <strong>Print checklist</strong>, off by default. Turn it on from the extension’s toolbar icon, and a button appears on an assignment’s Student work page. It opens a one-page printable list of every student and their STL file, grouped by the color named in the file. It’s a guess based on the filename, so each row has a dropdown to correct it. That makes it easy to run all the blue prints together.</p>

<p>One caution: it reads Classroom’s current page layout, so if Google changes that page, it may stop working until I update it.</p>

<h2 id="privacy">Privacy</h2>

<p>This matters for anything touching student work. There is no server and no analytics. The file is loaded into your browser’s memory using your existing Google session, drawn on screen, and released when you close the viewer. It’s never written to disk. The only things the extension saves are the two on/off switches for the optional features, plus any PNG you choose to export. The Print checklist reads names in your browser only and never saves or sends them anywhere. The full <a href="/privacy/stl-viewer/">privacy policy</a> spells it all out.</p>

<h2 id="how-to-get-it">How to get it</h2>

<p>I’m working on getting it into the Chrome Web Store, and I’ll update this post when it’s live. Until then it’s free and open source, and installing it by hand takes about two minutes:</p>

<ol>
  <li>Download <code class="language-plaintext highlighter-rouge">stl-viewer-extension.zip</code> from the <a href="https://github.com/GW228g/stl-viewer-extension/releases">Releases page</a> and unzip it.</li>
  <li>Go to <code class="language-plaintext highlighter-rouge">chrome://extensions</code> and switch on <strong>Developer mode</strong> (top right).</li>
  <li>Click <strong>Load unpacked</strong> and pick the unzipped folder.</li>
  <li>Open a Classroom assignment with a submitted STL and look for the <strong>View in 3D</strong> button under “No preview available.”</li>
</ol>

<p>Because it isn’t in the Web Store yet, it won’t update itself. To update, download the new zip, replace the folder, and click the refresh icon on its card in <code class="language-plaintext highlighter-rouge">chrome://extensions</code>.</p>

<p>A few honest limits: it works only with STL files (not OBJ or 3MF), only in Chrome, and only on Google Classroom and Drive pages.</p>

<p>The code is on <a href="https://github.com/GW228g/stl-viewer-extension">GitHub</a>. If something breaks, or you want a feature, open an issue there. I built this around my own classroom, so I’d love to hear how it works in yours.</p>

<p><img src="/assets/uploads/stl-viewer-icon.png" alt="STL Viewer for Google Classroom icon" /></p>]]></content><author><name>James Crawford</name></author><category term="3D Printing" /><category term="Classroom Tech" /><category term="Apps &amp; Tools" /><summary type="html"><![CDATA[A free Chrome extension that previews student STL files right inside Google Classroom. No downloads, no Tinkercad, no slicer needed.]]></summary><media:thumbnail xmlns:media="http://search.yahoo.com/mrss/" url="https://maker404.com/assets/uploads/stl-viewer-3dbenchy.jpg" /><media:content medium="image" url="https://maker404.com/assets/uploads/stl-viewer-3dbenchy.jpg" xmlns:media="http://search.yahoo.com/mrss/" /></entry><entry><title type="html">I Stopped Being a Minecraft Player and Became the Server Admin</title><link href="https://maker404.com/2026/09/14/minecraft-server-admin-for-my-kids/" rel="alternate" type="text/html" title="I Stopped Being a Minecraft Player and Became the Server Admin" /><published>2026-09-14T00:00:00+00:00</published><updated>2026-09-14T00:00:00+00:00</updated><id>https://maker404.com/2026/09/14/minecraft-server-admin-for-my-kids</id><content type="html" xml:base="https://maker404.com/2026/09/14/minecraft-server-admin-for-my-kids/"><![CDATA[<p>At some point, I stopped playing Minecraft and started running it.</p>

<p>It didn’t happen on purpose, and the timing is funny. I’m starting a new school year in a new school district, which means new people, new systems, and a long list of things I’m still figuring out. In the middle of all that, the one thing I wanted to work without thinking about it was the family Minecraft server.</p>

<p>A while back I wrote about <a href="/2026/01/27/unmined-to-cloudflare/">rendering our world into a web map every night</a>, which was about how the family <em>looks at</em> the world. This post is about how we <em>live in</em> it.</p>

<p>The goal was simple: a safe place for my kids and their friends to play together. No strangers, no drama, and no dad being asked for things every five minutes.</p>

<p>Simple, right? Not quite. Here’s what I learned.</p>

<hr />

<h2 id="the-setup-in-plain-english">The Setup, in Plain English</h2>

<p>Our server is a private family-and-friends world. Only people I’ve approved can join, and there’s a small cap on how many can be on at once. The difficulty is set to easy.</p>

<p>When you join, you’re greeted with the rules:</p>

<ul>
  <li>Be kind and use appropriate language.</li>
  <li>Don’t break or take other players’ builds or items.</li>
  <li>Don’t hurt other players or their animals.</li>
  <li>Create, don’t destroy.</li>
</ul>

<p>Four short rules that a kid can actually remember. I tried longer versions first. Nobody read them.</p>

<hr />

<h2 id="problem-1-someone-hurt-my-dog">Problem #1: “Someone Hurt My Dog”</h2>

<p>If you’ve ever run a kids’ server, you know this one. A kid spends an hour taming a wolf, names it, and then a friend wanders by and swings a sword at it. Cue tears.</p>

<p>I didn’t want to ban anyone over a pet. I also didn’t want “please be nice” to be the only protection.</p>

<p>So I set up a small ladder:</p>

<ol>
  <li><strong>First try:</strong> a friendly warning that named pets are protected.</li>
  <li><strong>Second try:</strong> a firm final warning.</li>
  <li><strong>Third try:</strong> five minutes in “pet jail,” where you can’t break or place blocks.</li>
  <li><strong>After that:</strong> a short 30-minute break from the server.</li>
</ol>

<p>The pet itself is never harmed, and the counter resets every 45 minutes so nobody carries a grudge forever.</p>

<p><strong>What I like most:</strong> it’s a consequence the kids understand. It’s quick, it’s fair, and it happens without me having to jump in.</p>

<hr />

<h2 id="problem-2-dad-can-i-have">Problem #2: “Dad, Can I Have…?”</h2>

<p>Minecraft has a lot of items. My kids want all of them. Usually right now, usually while I’m in the middle of something.</p>

<p>I wanted to say yes more often, and I wanted to stay in charge of what’s handed out. So I built a small helper that lives in our family Discord.</p>

<p>Here’s how it works:</p>

<ol>
  <li>A kid types what they want in their own words, like “can I have 64 emerald blocks.”</li>
  <li>The helper figures out who’s asking and what they want.</li>
  <li>I get a message with two buttons: <strong>Approve</strong> and <strong>Reject</strong>.</li>
  <li>One tap, and the items show up in their inventory.</li>
</ol>

<p>The kids get quick answers. I get the final say. Nobody has to stop their game to come find me.</p>

<p>There’s also a <code class="language-plaintext highlighter-rouge">/suggest</code> command in the game. A kid can type an idea or a complaint and it lands in a Discord channel for me to read. That channel has become my favorite part of the whole setup. It’s where I learn what they actually want next.</p>

<hr />

<h2 id="discord-my-server-remote-control">Discord: My Server Remote Control</h2>

<p>The item helper is only one piece. Over time, Discord has turned into the control room for the whole server, and it fits in my pocket.</p>

<p>Here’s what shows up on my phone without me logging in to anything:</p>

<ul>
  <li><strong>Who’s online.</strong> Every time someone joins or leaves, a short message appears with how many people are playing. I can tell at a glance whether the kids are on, and who with.</li>
  <li><strong>Blocked visitors.</strong> If someone who isn’t on the approved list tries to join, I get a message with their name. That’s how I find out when a friend of a friend is knocking, and decide whether to let them in.</li>
  <li><strong>Moderation alerts.</strong> If a pet-jail or regular jail is used, it’s posted in the channel, so I always know what happened and who was involved.</li>
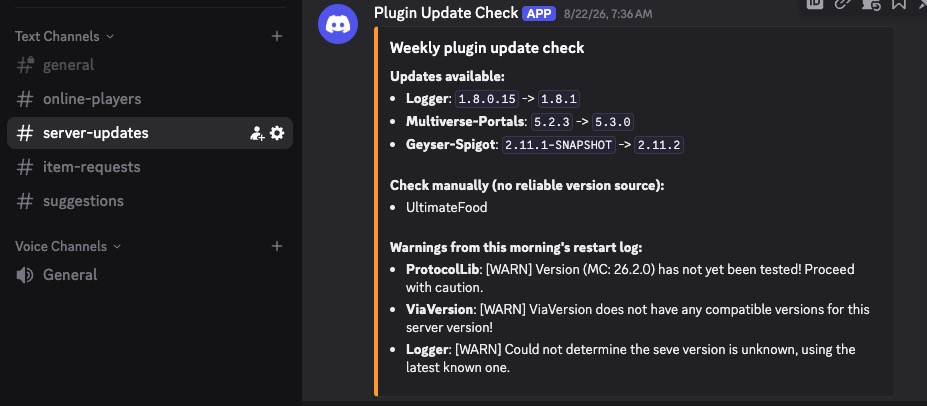
  <li><strong>Update warnings.</strong> Once a week, a check runs and tells me which add-ons are out of date. I don’t have to remember to look.</li>
  <li><strong>Server chat.</strong> What’s said in the game shows up in Discord, and what I type in Discord shows up in the game. I can say hello or tell them dinner’s ready without opening Minecraft.</li>
</ul>

<p><img src="/assets/uploads/minecraft-server-discord-update-check.png" alt="Discord channel list and a weekly plugin update check message listing plugins with updates available and warnings from the morning restart log" /></p>

<p><em>The weekly update check, posted to Discord once a week.</em></p>

<p>And then there’s the part that really changed things for me: a private channel where I can type simple commands and the server just does them.</p>

<p>Need to approve a new friend? Add them to the list from the couch. Someone stuck in a wall at 9 PM? A quick command from my phone gets them out. The kids’ item requests come to me as a tap. Before this, every one of these meant sitting down at the computer, logging in, and finding the right window. Now I do it in the time it takes to send a text.</p>

<p><strong>The honest caveat:</strong> that command channel is powerful, so it’s locked down to just me. Only the people I choose can see it, and I’d think hard before giving anyone else access.</p>

<p>It’s changed how I feel about running the server. A small problem used to be something I’d have to remember to deal with later, and now it takes a minute from wherever I am. If something does need a real computer, I at least know about it right away instead of finding out the next morning.</p>

<hr />

<h2 id="problem-3-everyone-plays-on-something-different">Problem #3: Everyone Plays on Something Different</h2>

<p>My family doesn’t all use the same device. Some of us are on computers, some are on consoles or tablets. Normally those players can’t join the same world.</p>

<p>A pair of add-ons fixed that. Now everybody, whatever they play on, ends up in the same world.</p>

<p>I also bought a friendly web address so the kids can type something easy to remember instead of a long string of letters and numbers. One small thing I’d tell any parent: a short, easy address makes getting friends online much less painful.</p>

<hr />

<h2 id="problem-4-the-chat-that-went-quiet">Problem #4: The Chat That Went Quiet</h2>

<p>This one drove me a little crazy.</p>

<p>One of the kids could type in chat and everyone could see it. But he couldn’t see what anyone else wrote. It lasted for days, and restarting the game didn’t fix it.</p>

<p>I checked everything on the server. Nothing was wrong. The server was working perfectly.</p>

<p>The real culprit was an Xbox privacy setting on his account. It only let him see messages from people on his Xbox friends list, so everyone else was being quietly filtered out.</p>

<p>The fix wasn’t a setting on my server at all. The kids needed to send each other friend requests on Xbox.</p>

<p><strong>Lesson learned:</strong> when something’s weird, check the server logs first. If the server shows everything working, the problem is probably on the player’s side.</p>

<hr />

<h2 id="problem-5-the-power-went-out">Problem #5: The Power Went Out</h2>

<p>A while back we lost power at home. When it came back, the computer started the Minecraft server before the internet was ready. The game worked fine, but the Discord connection quietly failed and never came back, so no notifications for hours.</p>

<p>Now the startup waits for the internet before it does anything else. It’s a tiny change, but it means I don’t have to wonder whether the server is really OK after a storm.</p>

<hr />

<h2 id="worlds-for-every-mood">Worlds for Every Mood</h2>

<p>One world got boring fast, so now we have several, all connected by portals:</p>

<ul>
  <li>A <strong>lobby</strong> that works as a home base</li>
  <li>The regular <strong>survival world</strong></li>
  <li><strong>Oneblock</strong>, where you start on a single block and build outward</li>
  <li><strong>Hogwarts</strong>, for the Harry Potter fans</li>
  <li><strong>Middle-earth</strong>, for the Lord of the Rings fans</li>
  <li>A few extra adventure worlds</li>
</ul>

<p>The kids pick based on their mood. Some days it’s building. Some days it’s wizards. All it takes is stepping through a portal.</p>

<p>There are also mods that let them turn into mobs. I didn’t plan to add those, and they’ve been the biggest hit.</p>

<hr />

<h2 id="keeping-it-boring-on-purpose">Keeping It Boring (On Purpose)</h2>

<p>Most of the work behind the scenes is invisible, and that’s the goal.</p>

<ul>
  <li><strong>Nightly backups</strong>, so a bad day never costs us a world.</li>
  <li><strong>A weekly check for updates</strong>, which posts to Discord when something needs attention. We run about two dozen add-ons, and keeping them current is the difference between smooth and broken.</li>
  <li><strong>Automatic restarts</strong> so the server stays fresh without me thinking about it.</li>
</ul>

<p>The best compliment a server can get is that nobody notices it.</p>

<hr />

<h2 id="lessons">Lessons</h2>

<ul>
  <li><strong>Most “tech” problems were really people problems.</strong> Pets, sharing, asking for stuff. The tools just made the rules enforceable.</li>
  <li><strong>Short rules beat long ones.</strong> Kids will remember four.</li>
  <li><strong>Check the logs before blaming the server.</strong> Or the kids.</li>
  <li><strong>Put the server where you already are.</strong> Discord on my phone beats a computer I have to be sitting at. Small fixes happen right away instead of piling up.</li>
  <li><strong>Let the kids drive.</strong> The <code class="language-plaintext highlighter-rouge">/suggest</code> channel tells me what to build next better than guessing does.</li>
  <li><strong>When everything else is new, keep one thing simple.</strong> A server that runs itself is worth more than a clever one I have to babysit.</li>
  <li><strong>Gentle consequences work.</strong> A few minutes in pet jail teaches more than a lecture.</li>
</ul>

<h2 id="what-id-do-differently">What I’d Do Differently</h2>

<ul>
  <li>Set up the update checks from day one instead of after things broke.</li>
  <li>Write the four rules before the first kid joined.</li>
  <li>Ask the kids what they wanted <em>before</em> I built things for them.</li>
</ul>

<hr />

<h2 id="final-thought">Final Thought</h2>

<p>I started this to give my kids a safe place to play. I ended up with something bigger: a little community with its own rules, its own worlds, and its own ways of asking Dad for things.</p>

<p>This fall, with so much else changing, I’m glad this part just works. That’s really what I was after the whole time: a setup that stays simple, so I can spend my energy on the new things instead.</p>

<p>If you run a server for your own family, I’d love to hear what’s worked for you.</p>

<p><em>Maker404: building things with the family, one problem at a time.</em></p>]]></content><author><name>James Crawford</name></author><category term="Minecraft &amp; Servers" /><category term="Outdoors &amp; Family" /><summary type="html"><![CDATA[How I run a safe, private Minecraft server for my kids and their friends, with Discord as my remote control, and why I wanted it to be simple this school year.]]></summary></entry><entry><title type="html">I Built a “Can We Boat?” App So My Kids Would Stop Asking Me Every Five Minutes</title><link href="https://maker404.com/2026/07/03/i-built-a-boat-or-no-boat-app-so-my-kids-would-stop-asking/" rel="alternate" type="text/html" title="I Built a “Can We Boat?” App So My Kids Would Stop Asking Me Every Five Minutes" /><published>2026-07-03T00:00:00+00:00</published><updated>2026-07-03T00:00:00+00:00</updated><id>https://maker404.com/2026/07/03/i-built-a-boat-or-no-boat-app-so-my-kids-would-stop-asking</id><content type="html" xml:base="https://maker404.com/2026/07/03/i-built-a-boat-or-no-boat-app-so-my-kids-would-stop-asking/"><![CDATA[<p>Most mornings during the summer, the question comes before I’ve even finished my tea. “Can we go on the boat today?” It’s not a bad question. It’s just one my kids ask constantly, and if I’m honest, I say yes more often than I probably should. Nobody wants to be the parent who says no, so I’d give the optimistic answer, and we’d get moving: load the cooler, dig out life jackets, find everyone’s water shoes, argue about who sits where in the car.</p>

<p>Then we’d actually get to the water, and more times than I’d like to admit, it was too choppy or too windy to be any fun. Now everyone’s disappointed, except it’s a worse kind of disappointed, because we already did all the work of getting ready. Finding out a trip is a bad idea five minutes before you load the car is annoying. Finding out after everything’s packed and everyone’s buckled in is a completely different level of letdown.</p>

<p>So I built a tool that looks at the numbers for me.</p>

<h2 id="the-problem-with-can-we-go-on-the-boat">The Problem With “Can We Go On The Boat?”</h2>

<p>Marine weather isn’t hard to find. It’s hard to interpret quickly, and it’s definitely not written for an eight-year-old. NOAA’s marine forecast reads like a shipping bulletin. Wind is one site. Waves are another. Tides are a third. None of them tell you the thing you actually want to know, which is: is today a good day, a rough day, or a stay-home day?</p>

<p>I was doing this translation manually every morning; check the wind, check the wave height, check the tide, mentally combine all three into a gut call, then explain that call to two kids who don’t care about wind speed in knots. They just want to know if we’re going.</p>

<p>That gap, between “here are six numbers from three different sources” and “yes, kinda, or not today”, is exactly the kind of thing I like turning into a small app.</p>

<h2 id="what-i-built">What I Built</h2>

<p><a href="https://maker404.com/apps/can-we-boat/can-we-boat.html">Can We Boat?</a> is a free, browser-based boating conditions tool. No install, no account, no ads. You either allow location access or search for a marina, ramp, or town, and it gives you a clear verdict for the next several hours.</p>

<p>There are two views. The Simple view is the one my kids actually use: a big face (happy, so-so, or worried), a one-sentence explanation like “It’s a little choppy out there today. Okay for some, but ask a grown-up first,” and four or five plain stats: wind, waves, next high and low tide, water temp, and sun. They can check it themselves before they come find me.</p>

<p>The Detailed view is the one I use: the same go/caution/no-go verdict, but backed by a full breakdown, an actual tide chart for the day, and the National Weather Service’s marine forecast and any active Small Craft Advisories for the zone we’re in. If there’s a real advisory out, it shows up as a banner in both views, because that’s not information I want buried in the detailed screen only.</p>

<h2 id="the-boating-style-selector">The Boating Style Selector</h2>

<p>The hardest part to get right wasn’t the weather data. It was figuring out what “too rough” even means, because it depends entirely on who’s on the boat and what they’re doing.</p>

<p>Instead of asking people to define their own thresholds, I built three presets:</p>

<ul>
  <li><strong>Glass calm</strong> is for young kids, first-timers, or anyone who wants a mirror-flat morning</li>
  <li><strong>Average boater</strong> is the default, reasonable chop is fine, but it flags anything building toward genuinely uncomfortable</li>
  <li><strong>Chop’s fine</strong> is for people who don’t mind a bumpy ride</li>
</ul>

<p>Whichever one is selected changes the wind and wave thresholds that drive the verdict. There’s also a “What do these mean?” link right on the page that shows the exact numbers behind each style, because I don’t like tools that hide their own logic.</p>

<p>One thing that surprised me while building this: the rating is driven mostly by peak wind <em>gusts</em>, not the average wind speed. A day can show up as only 5 or 6 mph average wind and still get flagged as Caution, because the forecast has a gust spiking to 20+ mph in the next few hours. That felt wrong the first time I saw it until I thought about it for two seconds: a sustained 6 mph breeze is nothing, but a sudden 20 mph gust is exactly the kind of thing that catches a small boat off guard. Average wind is comfortable. Gusts are what actually get you.</p>

<h2 id="how-i-built-it">How I Built It</h2>

<p>Like most of what I put on this site, it’s a single HTML file with no backend, deployed as a static page. No server costs, nothing to maintain beyond the code itself.</p>

<p>The data behind it is all free, with no API keys:</p>

<ul>
  <li><strong>Wind and wave forecasts</strong> come from <a href="https://open-meteo.com">Open-Meteo</a>, including their dedicated marine API for wave height, period, and sea surface temperature</li>
  <li><strong>Tide predictions</strong> come from <a href="https://tidesandcurrents.noaa.gov">NOAA CO-OPS</a>, using the nearest tide station to whatever location is selected. For smaller stations that only publish high/low times and not a full hourly curve, the app approximates a smooth tide curve from those points so there’s still something useful to look at</li>
  <li><strong>Marine zone forecasts and Small Craft Advisories</strong> come from the <a href="https://www.weather.gov/documentation/services-web-api">National Weather Service API</a>, the same source that feeds the official marine forecast pages</li>
</ul>

<p>Location comes from the browser’s Geolocation API, with a plain search box as a fallback for planning ahead or checking a spot you’re not standing at yet. Light and dark mode are both supported, since half the time I’m checking this before sunrise.</p>

<h2 id="where-this-fits-for-us">Where This Fits for Us</h2>

<p>The actual routine now is boring in the best way. Someone asks if we can go on the boat. Instead of answering from memory or guessing, I open Can We Boat? on my phone, and increasingly, my older kid just opens it herself. Green face, we’re going. Yellow face, we talk about it and maybe wait a few hours. Red face, we do something else, and there’s no argument about it because the app said it, not me.</p>

<p>It’s a small thing. It’s not going to change anyone’s life. But it’s already saved us from at least one trip where we would have packed the whole car for nothing, and it’s turned a repeated argument into a thirty-second check before anyone touches a cooler. For a free tool built in a few evenings, that’s a pretty good return.</p>

<p>Try it at <a href="https://maker404.com/apps/can-we-boat/can-we-boat.html">maker404.com/apps/can-we-boat</a>. No account, no install, no cost, and hopefully a few less “can we go on the boat” arguments in your house too.</p>]]></content><author><name>Maker404</name></author><category term="Outdoors &amp; Family" /><category term="Apps &amp; Tools" /><summary type="html"><![CDATA[My kids ask "can we go on the boat today?" more mornings than not, and I say yes more than I should, only to have everyone disappointed once we're already packed up and the water isn't cooperating. So I built Can We Boat?, a free go/no-go boating conditions app they can check before we ever load the car.]]></summary><media:thumbnail xmlns:media="http://search.yahoo.com/mrss/" url="https://maker404.com/assets/uploads/can-we-boat_screenshot.jpg" /><media:content medium="image" url="https://maker404.com/assets/uploads/can-we-boat_screenshot.jpg" xmlns:media="http://search.yahoo.com/mrss/" /></entry><entry><title type="html">Leaving a School After 5 Years: What I Did to Take My Resources With Me</title><link href="https://maker404.com/2026/05/28/how-to-backup-your-clever-teacher-page/" rel="alternate" type="text/html" title="Leaving a School After 5 Years: What I Did to Take My Resources With Me" /><published>2026-05-28T00:00:00+00:00</published><updated>2026-05-28T00:00:00+00:00</updated><id>https://maker404.com/2026/05/28/how-to-backup-your-clever-teacher-page</id><content type="html" xml:base="https://maker404.com/2026/05/28/how-to-backup-your-clever-teacher-page/"><![CDATA[<p>At some point this spring I started doing the math on how long I’ve been at my current school. Five years. Five years of innovation lab, makerspace projects, Finch robots, laser cutting, 3D printing, and one very patient group of students who let me figure out what a K-6 technology curriculum should actually look like while they were living through it.</p>

<p>Part of that work, the part that doesn’t show up in any lesson plan, is the slow accumulation of resources. Links I found at 10pm on a Tuesday that turned out to be exactly right for a third grade coding unit. Google Forms I built for a digital breakout room series and then refined for two years. Pathways through Raspberry Pi Python tutorials that I tested personally before I ever put them in front of a sixth grader. A Digital Citizenship section I kept reorganizing until the sequence finally made sense.</p>

<p>All of it lived on my Clever Teacher Page.</p>

<p>When I started thinking seriously about moving to a new district, the first thing I felt good about was the curriculum I’d built. The second thing I felt was a slow-dawning realization that I had no idea how to take it with me.</p>

<h2 id="the-problem-with-clever">The Problem with Clever</h2>

<p>Clever is great for a lot of things. Single sign-on for students, organized app access, district-wide deployment. What it is not great at is letting you leave.</p>

<p>There is no export button. No “download my page” option. No way to say, here are all the links I’ve spent years curating, I’d like a copy of those please. When your district account is deactivated, your Teacher Page just closes with it. Everything you organized, everything you labeled, every section you built and rebuilt until it reflected how you actually teach. Gone.</p>

<p>I spent about twenty minutes clicking around Clever looking for something I’d missed before I accepted that it wasn’t there.</p>

<h2 id="what-i-found-instead">What I Found Instead</h2>

<p>The workaround turns out to be sitting right in your browser. When you save a webpage in Chrome using File &gt; Save Page As, Chrome doesn’t save the raw source code. It saves the live page: what’s actually on your screen after all the JavaScript has run and all your content has loaded. For a React app like Clever’s Teacher Page, that means your section names, your link titles, and your URLs are all sitting in the saved HTML file, organized and labeled.</p>

<p>I wrote a small tool that reads that file and pulls out everything useful. You save your Clever page as an HTML file, drop it into the tool, and get a CSV with four columns: section, name, URL, and a notes field that flags any link that goes through Clever’s SSO system. The whole thing runs in your browser. Nothing is uploaded anywhere.</p>

<p>The SSO flag matters. Some apps on your Clever page don’t actually have a direct URL. They run through a Clever authorization flow, which handles your login automatically as long as your account is active. Once your account closes, those links just redirect you to a dead end. The CSV tells you which ones they are so you can track down the direct login pages at your new district instead of being surprised later.</p>

<p>In my case, things like the Raspberry Pi pathways and the Digital Passport games had clean direct URLs that will work from any computer. CodeMonkey and Khan Academy went through Clever SSO, which means I’ll be setting those up fresh wherever I land next.</p>

<h2 id="five-years-of-links-in-a-spreadsheet">Five Years of Links, in a Spreadsheet</h2>

<p>When I ran my own page through the tool I ended up with 38 rows across seven sections: Templates, Digital Citizenship, Coding, Digital Breakout Rooms, Parts of a Computer, Lego Wall, and Newly Added. Looking at that list in a spreadsheet was a strange experience. It was small in a way that felt wrong for five years of work, and at the same time it was more organized and complete than anything I’d kept elsewhere.</p>

<p>The “Newly Added” section had three apps in it that I had set up but never actually launched with students. I remembered adding them. I remembered meaning to build a unit around them. That section was basically a to-do list that I never got back to, which is probably true of every teacher’s Clever page.</p>

<p>That’s the thing about having it in a CSV. You can actually look at it. You can sort by section, figure out what you used and what you didn’t, decide what you want to bring to a new context and what was specific to this school. It turns five years of accumulated decisions into something you can actually think about.</p>

<h2 id="clever-was-just-the-beginning">Clever Was Just the Beginning</h2>

<p>Once I started thinking about what lived on my Clever page, I couldn’t stop thinking about everything else I had built inside school accounts over five years.</p>

<p>The thing is, teachers accumulate resources in a lot of places. And most of those places are tied to an account that closes when you leave. Clever is the most obvious one because it’s designed around your curated list of tools and you notice immediately that there’s no way out. But it’s not the only place your work is quietly waiting to disappear.</p>

<p><strong>Chrome bookmarks.</strong> If you’ve been using Chrome with your school Google account as the active profile, your bookmarks are synced to that account, not your personal one. That’s five years of “I’ll come back to this” folders, professional development resources, curriculum sites, tools you found and meant to use. When the account closes, they’re gone. Before you leave, open Chrome, go to Bookmarks &gt; Bookmark Manager, click the three-dot menu in the top right, and choose Export Bookmarks. You’ll get an HTML file you can import into any browser or personal Chrome profile. It takes about thirty seconds.</p>

<p><strong>Saved passwords.</strong> This one surprised me when I thought it through. If you’ve ever let Chrome save a password while you were signed into your school account, that password is stored in your school Google account, not locally on your machine. You might not even realize which passwords went where. To find out, go to Chrome Settings, then Autofill, then Password Manager. There’s an export option that downloads everything as a CSV. Save it somewhere secure, because it is obviously sensitive. But the alternative is losing access to every account you set up during your time at that school and can’t remember the password for. Go through the list, update the accounts that matter to use your personal email address, and export the rest as a reference.</p>

<p><strong>Google Drive.</strong> If you created files in your school Google account rather than your personal one, those files are owned by the school. Some districts let you transfer ownership or download everything before your account closes. Some don’t give you much notice. It’s worth going to Google Takeout (takeout.google.com) while you still have access and downloading an archive of everything in your school Drive. Even if most of it is stuff you don’t need, the things you do need will be there.</p>

<p><strong>Your school email contacts.</strong> This is the one teachers most often forget. If you’ve been emailing with parents, vendors, professional development contacts, or colleagues at other schools through your district email, those contacts are in your school account. Export them from Google Contacts before your last day.</p>

<p>None of this is complicated. It’s all stuff that takes a few minutes once you know to do it. The hard part is remembering to do it before your account closes, not after.</p>

<h2 id="how-to-back-up-your-clever-page-specifically">How to Back Up Your Clever Page Specifically</h2>

<p>Go to your Clever Teacher Page and make sure all your sections have fully loaded on screen. Then press Cmd+S on Mac or Ctrl+S on Windows. When the save dialog appears, set the format to Webpage, HTML Only. Save the file somewhere you can find it.</p>

<p>Then go to the <a href="https://maker404.com/apps/clever-backup-tool/clever-backup">Clever Backup Tool on maker404.com</a>, drag in your saved HTML file, and click Download CSV.</p>

<p>That’s it. Two minutes, start to finish.</p>

<p>If the tool says no links were found, the most likely cause is saving in the wrong format. “Webpage, Complete” saves the HTML plus a folder of supporting files. Either format actually works, but if you got the folder version, try re-saving and choosing “HTML Only” instead.</p>

<p>One thing to know going in: this captures your Teacher Page resource links, not your student app assignments or class configurations. Those live in a different part of Clever and would need to be documented separately. But if what you’re trying to preserve is the curated list of resources you’ve built over time, this is what you need.</p>

<h2 id="the-thing-i-wish-i-had-done-sooner">The Thing I Wish I Had Done Sooner</h2>

<p>I should have run this export at the end of every school year, not just when I started thinking about leaving.</p>

<p>A Clever Teacher Page is a living document. Links break. Apps you loved in September get discontinued by March. You add something during a conference and forget about it by the time you’d actually use it. An annual export would have given me a record of how my thinking evolved year over year, which would have been genuinely useful for my self-reflection process and for telling the story of what I built to a hiring committee.</p>

<p>If you’re not changing jobs right now, do the export anyway. Treat it like backing up your hard drive. It takes two minutes and you’ll be glad you have it.</p>

<p>Good luck to anyone else in the middle of the same kind of transition. Five years is a long time to build something. It deserves to come with you.</p>]]></content><author><name>James Crawford</name></author><category term="Classroom Tech" /><category term="Apps &amp; Tools" /><summary type="html"><![CDATA[When I started packing up my classroom after five years, I realized how much I had built inside school accounts I was about to lose. Clever, Chrome bookmarks, saved passwords. Here's how I thought through all of it.]]></summary><media:thumbnail xmlns:media="http://search.yahoo.com/mrss/" url="https://maker404.com/assets/app-previews/clever-backup-tool.png" /><media:content medium="image" url="https://maker404.com/assets/app-previews/clever-backup-tool.png" xmlns:media="http://search.yahoo.com/mrss/" /></entry><entry><title type="html">Five Maker Challenges I Reach For First (And Why They Keep Working)</title><link href="https://maker404.com/2026/05/21/maker-challenges-that-teach-engineering/" rel="alternate" type="text/html" title="Five Maker Challenges I Reach For First (And Why They Keep Working)" /><published>2026-05-21T00:00:00+00:00</published><updated>2026-05-21T00:00:00+00:00</updated><id>https://maker404.com/2026/05/21/maker-challenges-that-teach-engineering</id><content type="html" xml:base="https://maker404.com/2026/05/21/maker-challenges-that-teach-engineering/"><![CDATA[<p>After a few years of running makerspace challenges with K-6 students, I’ve noticed that most of what gets labelled a “STEM activity” falls into one of two buckets: things that look impressive but don’t actually teach anything, and things that are genuinely hard to facilitate in a real classroom. The first kind has great photos. The second kind produces real learning.</p>

<p>The challenges I keep coming back to sit in the middle: low-prep, concrete enough to finish in 45-60 minutes, and built around a concept that students can actually articulate at the end. Not “we built a bridge today” but “I know why triangles make structures stronger.”</p>

<p>These are the five I reach for most.</p>

<h2 id="1-straw-tower">1. Straw Tower</h2>

<p><strong>What students build:</strong> The tallest freestanding tower they can from a fixed number of straws and tape.</p>

<p><strong>What it actually teaches:</strong> This is the best first challenge I’ve found for any age group, partly because the goal is obvious (tall, freestanding) and partly because failure is immediate and visible. A tower that tips over doesn’t need explaining. Students know before I say a word that something about their design didn’t work.</p>

<p>The real engineering lesson is in the iteration. Students who start by stacking straws vertically discover quickly that height without a stable base goes nowhere. The ones who triangulate their base — usually after watching their third tower collapse — have a working model of why trusses matter before they’ve heard the word.</p>

<p>I run this one on the first day of any new group because it tells me everything I need to know about how they handle constraint, failure, and collaboration in about 35 minutes.</p>

<p><a href="/404-challenges/straw-tower-challenge/">See the full Straw Tower Challenge</a></p>

<h2 id="2-balloon-powered-car">2. Balloon-Powered Car</h2>

<p><strong>What students build:</strong> A vehicle that travels as far as possible using only the thrust from a balloon.</p>

<p><strong>What it actually teaches:</strong> Newton’s Third Law is famously hard to teach through direct instruction. “Every action has an equal and opposite reaction” means almost nothing to a nine-year-old sitting at a desk. But watch a kid’s face the first time their car shoots sideways instead of forward because the balloon nozzle was aimed at an angle — that’s the reaction clicking into place.</p>

<p>The wheel alignment problem is the second lesson inside this one. Students who get a straight-shooting car quickly move on to why some cars go farther than others. Weight, friction, wheel fit on the axle — they’re doing physics optimization with no equations in sight.</p>

<p>This one also has the best testing moments of any challenge I run. Watching six cars go simultaneously with the whole class counting distance is the kind of shared experience that students remember.</p>

<p><a href="/404-challenges/balloon-powered-car/">See the full Balloon-Powered Car Challenge</a></p>

<h2 id="3-bridge-builder">3. Bridge Builder</h2>

<p><strong>What students build:</strong> A popsicle-stick bridge that spans 12 inches and holds as much weight as possible.</p>

<p><strong>What it actually teaches:</strong> This is the deepest engineering challenge on this list and the best one for older students (Grades 3-6). The span requirement is strict enough to force real decisions about structure, and the load test is honest — the bridge either holds or it doesn’t.</p>

<p>What I’ve learned from running this one is that the most valuable moment isn’t the test itself. It’s the minute right after a bridge fails, when students can see exactly where it broke. Joint failures look different from center-span failures, which look different from torsion failures. Students who observe this carefully leave with genuine structural intuition, not just a memory of how many pennies their bridge held.</p>

<p>I’ve started having groups sketch a failure analysis after the test — just a quick drawing of where the break happened and one sentence about why. That five-minute addition changes what they remember.</p>

<p><a href="/404-challenges/bridge-builder-challenge/">See the full Bridge Builder Challenge</a></p>

<h2 id="4-paper-airplane-olympics">4. Paper Airplane Olympics</h2>

<p><strong>What students build:</strong> Paper airplanes optimized for one of three events: distance, accuracy, or hang time.</p>

<p><strong>What it actually teaches:</strong> Most paper airplane activities are about folding. This one is about data. Students build, throw, measure, modify, throw again, and track what changed between versions. The three-event format is what makes it work — designing for distance and designing for hang time require almost opposite choices, and students figure that out through iteration rather than instruction.</p>

<p>The data collection piece is genuinely useful here even for young students. A simple table of “fold, result, what I changed” introduces the idea that a test is only informative if you change one thing at a time. They’re doing experimental design with three sheets of copy paper.</p>

<p>I run this one when I want a challenge that scales gracefully — kindergarteners can participate meaningfully alongside sixth graders because the task is open-ended enough to meet people where they are.</p>

<p><a href="/404-challenges/paper-airplane-olympics/">See the full Paper Airplane Olympics Challenge</a></p>

<h2 id="5-cardboard-creature">5. Cardboard Creature</h2>

<p><strong>What students build:</strong> A creature — real or invented — with at least one moving part, built from cardboard, tape, and brads.</p>

<p><strong>What it actually teaches:</strong> This is the one I use when I want to teach joints and motion design in a context where students are actually invested in the outcome. The combination of creative ownership and engineering constraint is unusually effective: students care whether the wing actually flaps because it’s <em>their</em> creature’s wing.</p>

<p>The key teaching moment is the brad joint. You can’t just tape a flapping part to a body and expect it to move — you need a pivot point. Realizing that a moving connection requires intentional design is the same conceptual jump that engineers make when they think about linkages, hinges, and mechanical joints. Students arrive at it on their own because the materials make the solution obvious once they’ve tried everything else.</p>

<p>This one works especially well with younger students (K-2) because the creative entry point lowers the intimidation factor while the joint constraint keeps it genuinely challenging.</p>

<p><a href="/404-challenges/cardboard-creature/">See the full Cardboard Creature Challenge</a></p>

<hr />

<h2 id="what-these-five-have-in-common">What These Five Have in Common</h2>

<p>Looking back at the list: none of these require special equipment. None of them take more than an hour. All of them produce a testable object. And all of them have a moment — usually during testing — where students discover something real about how the physical world works.</p>

<p>That last part is what I keep looking for in a challenge. Not that students learned the vocabulary word, but that they found the concept. The vocabulary can come later. The moment where a kid realizes why their bridge broke at the joint and not the center span — that’s the thing worth designing a lesson around.</p>

<p>If you want to browse the full challenge library, the <a href="/404-challenges/">404 Challenges</a> page has everything, each one tagged by grade level, time, and difficulty.</p>]]></content><author><name>Maker404</name></author><category term="STEM Lessons" /><summary type="html"><![CDATA[A tech teacher shares the five low-prep maker challenges that reliably teach engineering thinking, and what actually happens in the room when students build them.]]></summary></entry></feed>